Sensor 部署
用戶端部署
連線方式
在進行端點部署前,需要先了解環境中的端點能夠透過那些方式連線到 Vision One
如果端點無法直接連線至網際網路則需要考慮透過 Service Gateway 或是 Proxy 連線出去
並建議建立兩個或以上的 Service Gateway 或 Proxy 避免連線異常中斷
Service Gateway Forward Proxy Service (FPS)
部署前需要先參考設定 Service Gateway 所需要的防火牆設定
Deploy a Service Gateway and Configure Firewall Exceptions
並依照 Service Gateway 底下的端點會開啟哪些功能去開啟防火牆設定
Firewall exceptions: Singapore - all exceptions
Service Gateway 各個功能會用到的 Port
Ports used by the Service Gateway virtual appliance
在 Workflow and Automation 的 Service Gateway Management 中點擊 Download
Virtual Appliance
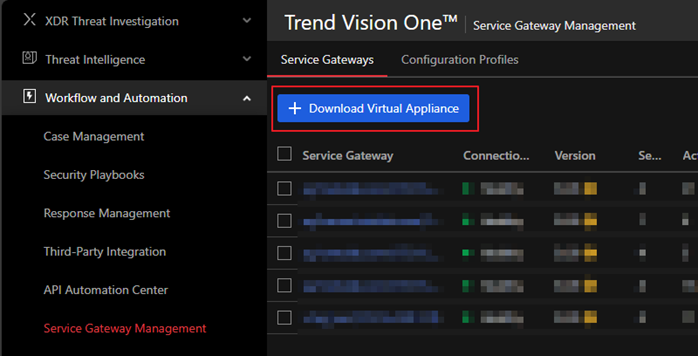
在彈出的右側欄選擇 Service Gateway 類型以及 Registration Token 記得先複製
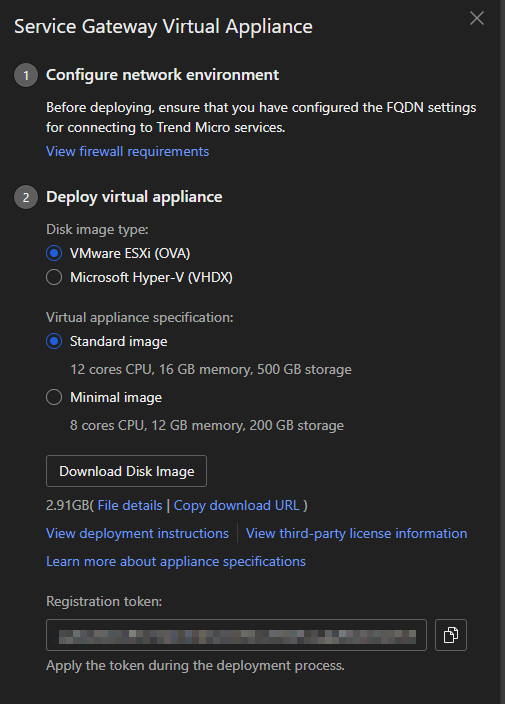
可以先參考 System Requirements 的說明後進行選擇
Service Gateway appliance system requirements
依照 Disk image type 部署完畢後,使用下列資訊登入:
帳號:admin
密碼:V1SG@2021
登入成功後會要求變更密碼

輸入 enable 進入 administrative commands
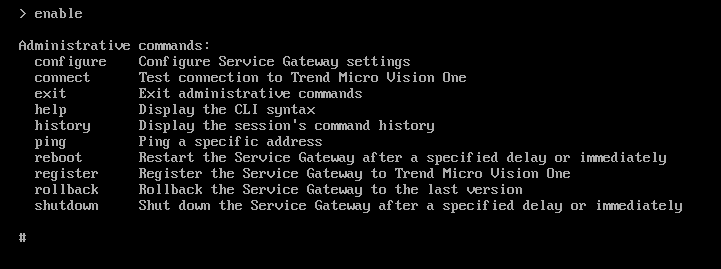
首先設定 Service Gateway 的 IP、Gateway、DNS
Configure network primary ipv4.static <interface> <ip_cidr> <gateway> <dns1> [dns2] [cni]

透過稍早複製的 Registration Token 註冊

完成後即可在 Service Gateway Management 看到該 Service Gateway 回報

點擊 Service Gateway 的名稱進入後找到 Manage Services
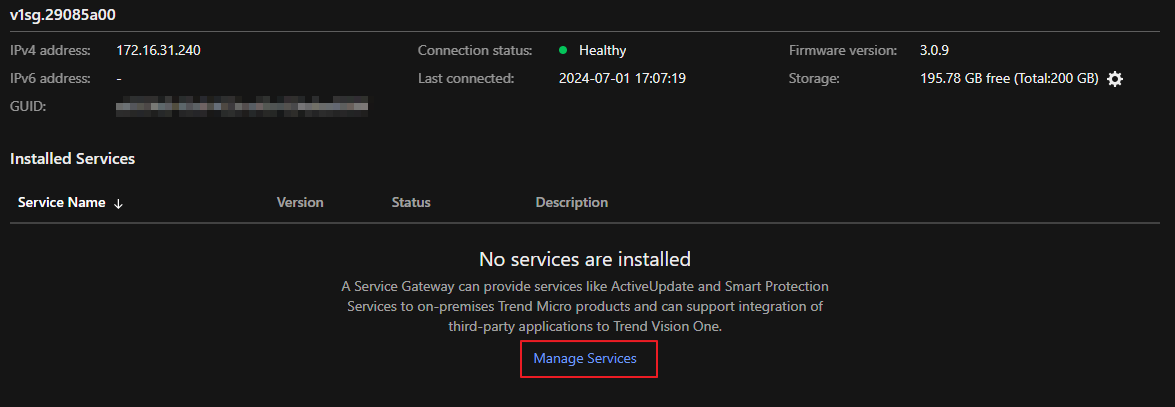
在 Manage Services 中找到 Forward Proxy Service 並下載安裝
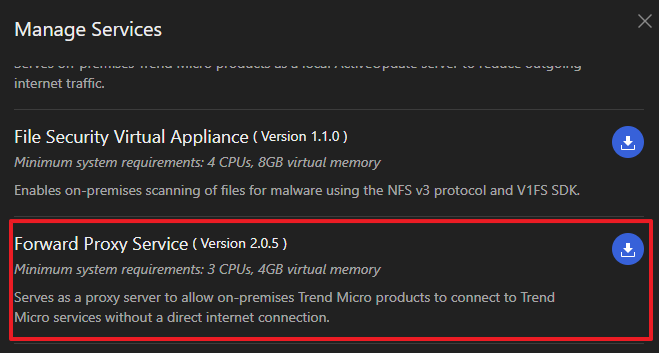
等待 Service 安裝完成


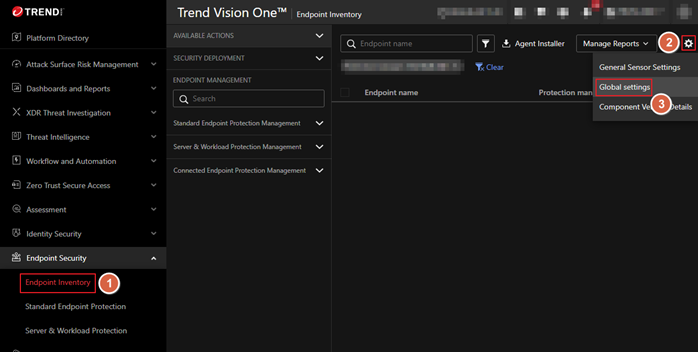
完成後在 Endpoint Security 的 Endpoint Inventory 中點擊齒輪圖示後點擊
Global settings
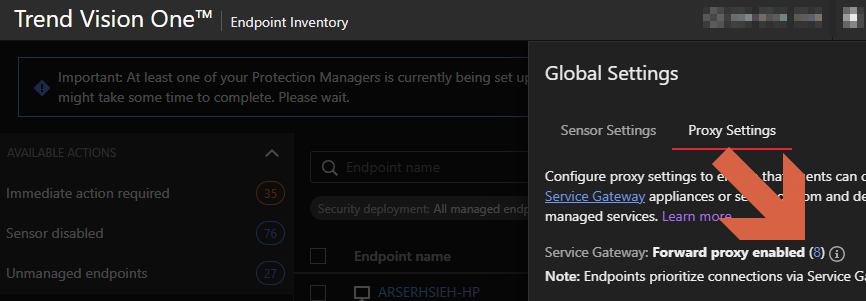
在 Agent Installer Proxy Settings 中
Service Gateway: Forward proxy enabled 數字應該增加
Note
請在確認 Forward proxy 啟用且具有該服務的 Service Gateway 的 Connection
status 為 Healthy 的情況
下載 Agent Installer 以確保最新的設定有包含在 Agent Installer 中
Custom proxy
在 Endpoint Security 的 Endpoint Inventory 中點擊齒輪圖示後點擊
Global settings

在 Global settings 找到 Agent Installer Proxy Settings 為需要 Proxy 的服務設定
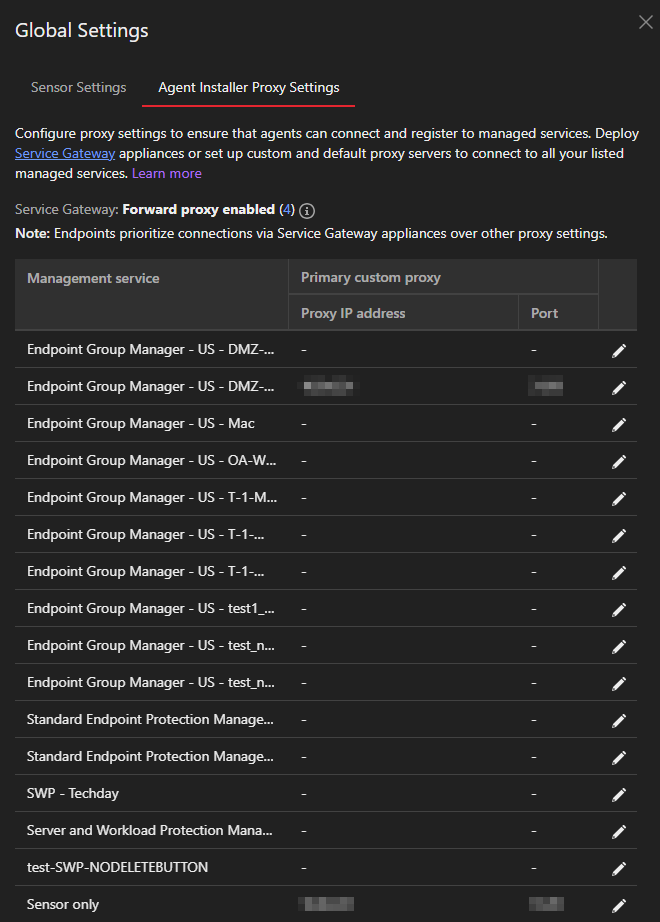
設定完成後請下載新的 Agent Installer 並透過新的 Installer 安裝
Standard Endpoint Protection (SEP)
Windows
直接安裝
請至 Endpoint Inventory 點擊 Agent Installer,在彈出的右側欄
找到 Standard Endpoint Protection (SEP) 區塊,依序完成以下設定後下載 Agent Installer:
- Operating system:選擇對應的作業系統
- OS architecture:選擇對應的作業系統位元數
- Endpoint Group Manager (EGM):選擇端點歸屬的 Endpoint Group
- Agent installer proxy:
- 此選項僅影響「安裝過程」中的連線,與 Agent 安裝完成後的日常運作設定 (Runtime Proxy Settings) 無關。
- 預設為 Use Agent Installer Proxy Settings 依序測試所有已知 Proxy 並找到可用的,順序參考:Agent Installer Proxy Settings
- 僅在需強制指定安裝期間的連線通道時才需更改。
- 點擊右下角的 下載圖示 取得安裝檔。
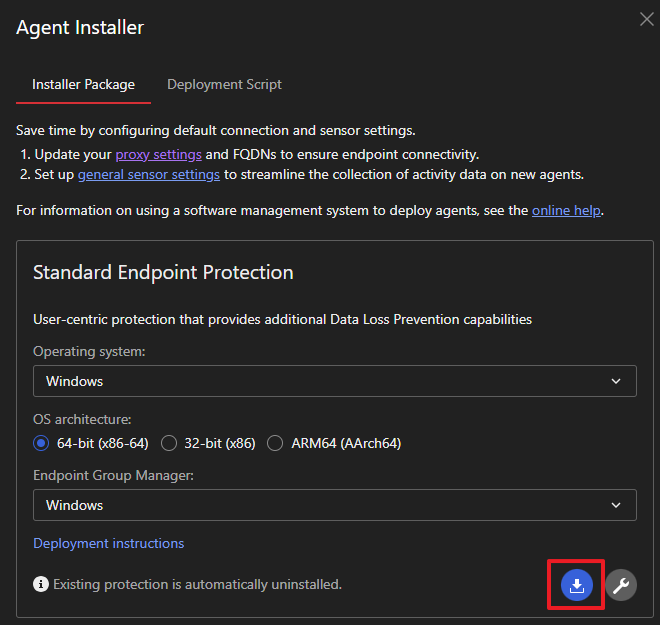
下載取得 TMStandardAgent_Windows_x86_64_Windows.zip
Warning
解壓縮取得的檔案請保持它們的名稱與相對位置
請勿重新命名、變更或移動安裝套件中的任何檔案或資料夾,避免安裝過程中找不到檔案。
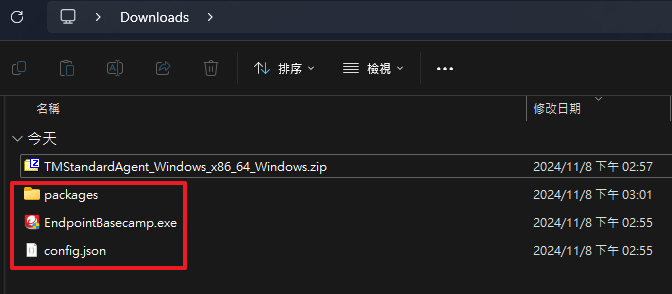
以系統管理員身分執行 EndpointBasecamp.exe 並等待安裝完成

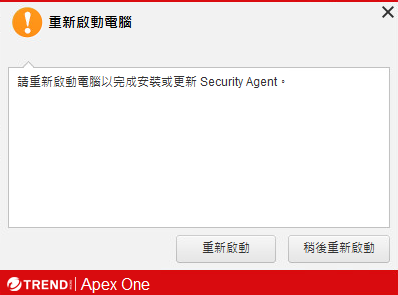
安裝完成後可能會需要重新啟動,agent會在右下方彈出提示。
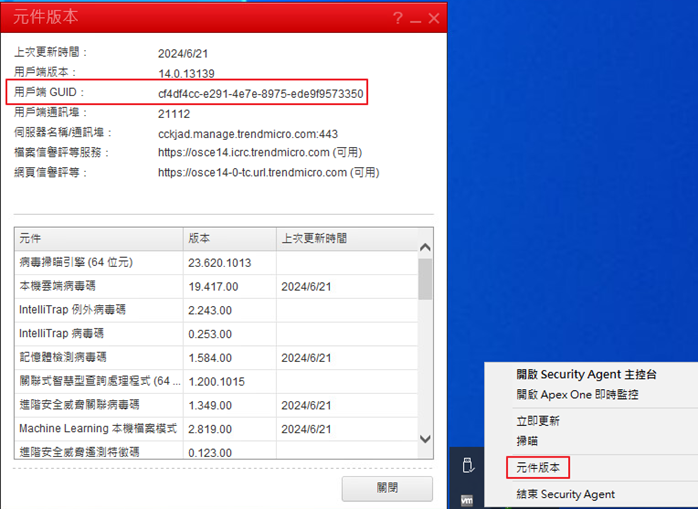
在元件版本中可以看到用戶端 GUID
Microsoft Active Directory Group Policy
可以部署 PowerShell Script 來透過 GPO 部署 agent 首先下載 Sample Script 參考 Script 範本
Info
由於此範例也會同時檢查 SWP 的服務(amsp,ds_agent)因此也適用於 SWP
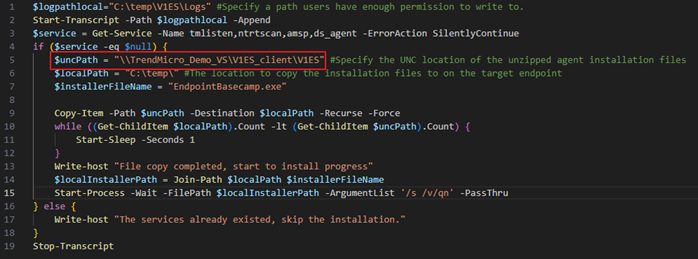
$uncPath 請依照環境內實際儲存「已經解壓縮的 agent installer」的位置修改
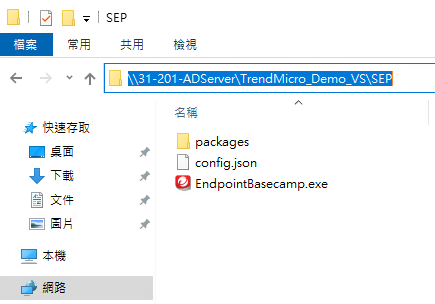
例如本次範例儲存在 \\31-201-ADServer\TrendMicro_Demo_VS\SEP
則必須將 $uncPath 修改成 \\31-201-ADServer\TrendMicro_Demo_VS\SEP\*
Warning
不同版本的 PowerShell 對於不在最後標註 * 的行為可能不同
Windows Server 2022 會只複製資料夾底下的內容(不符合預期)
Windows 10 22H2 會連同該資料夾一起複製(符合預期)
部署 Script 前,如果有不同版本的作業系統,請確認是否對同一種寫法有不同的行為
否則,這會導致在後續取得 EndpointBasecamp.exe 的位置有問題
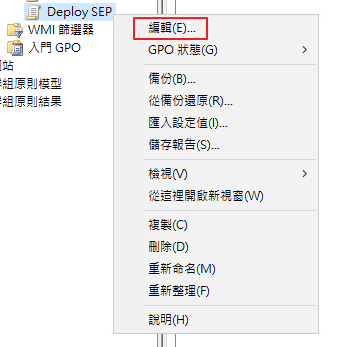
新增一個 GPO
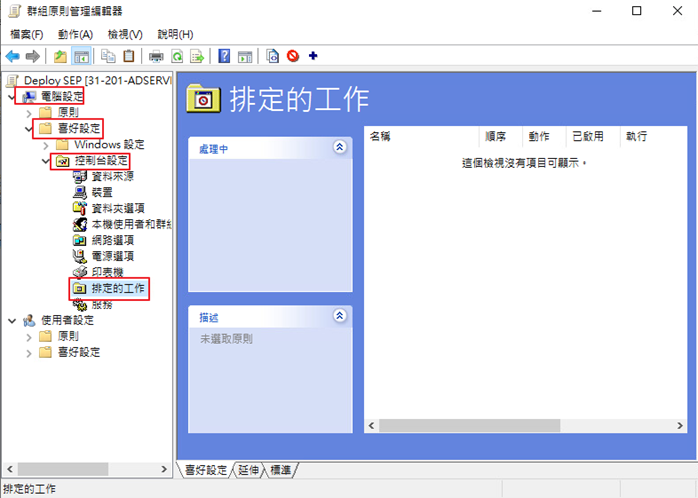
電腦設定 > 喜好設定 > 控制台設定 > 排定的工作
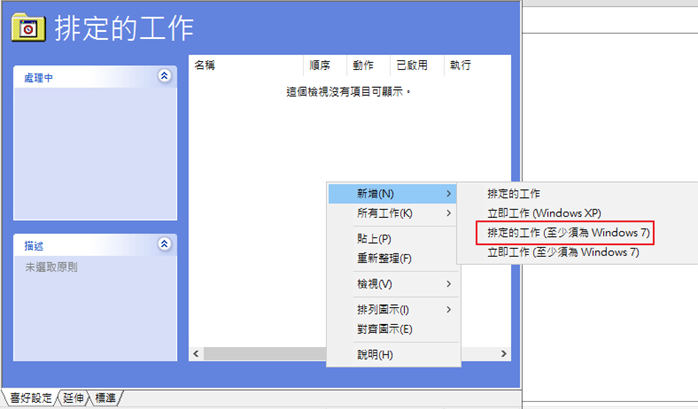
右鍵 > 新增 > 排定的工作
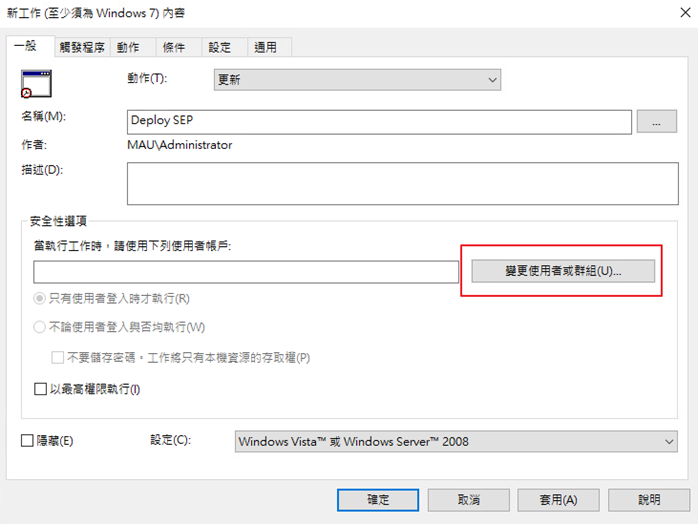
選擇變更使用者或群組
輸入 SYSTEM 後檢查名稱接著按下確定
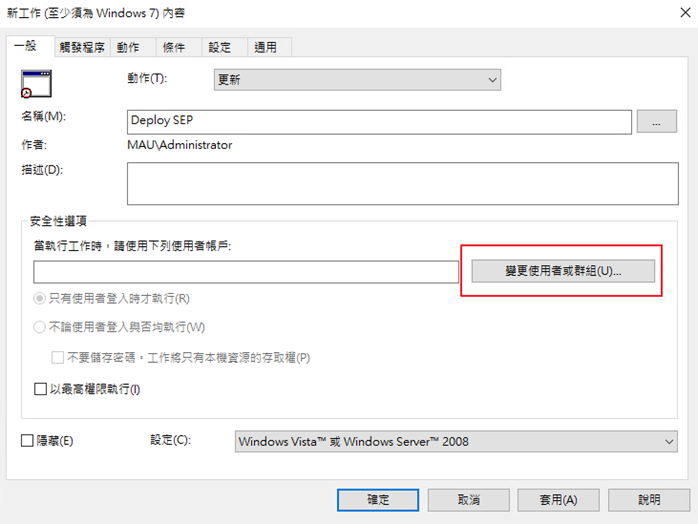
選擇不論使用者登入與否均執行並勾選以最高權限執行
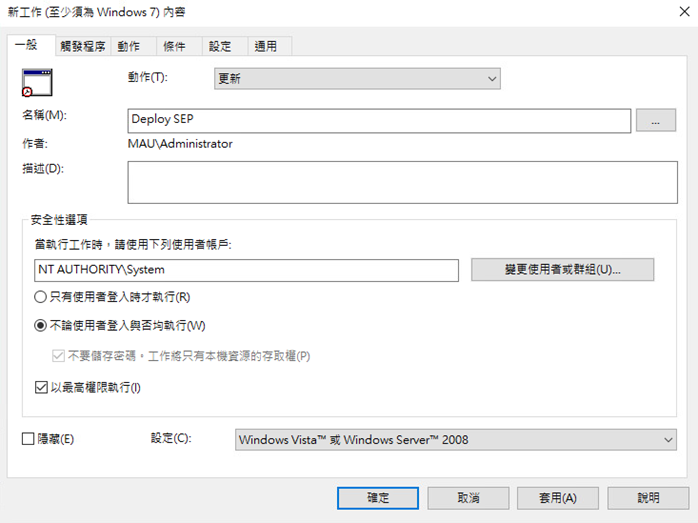
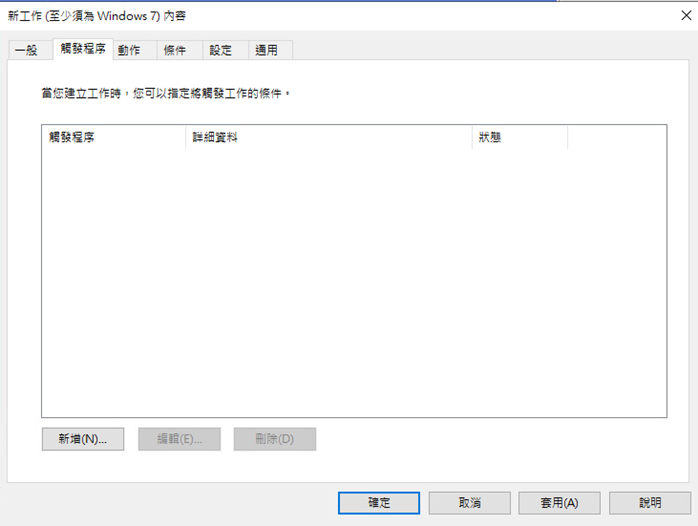
接著在觸發程序設定一個想要觸發的條件
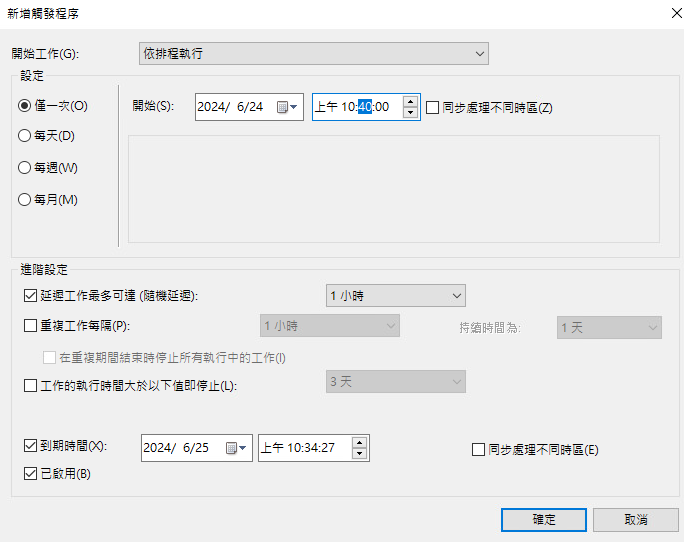
最後在動作設定 powershell.exe -file “Script 所在位置”
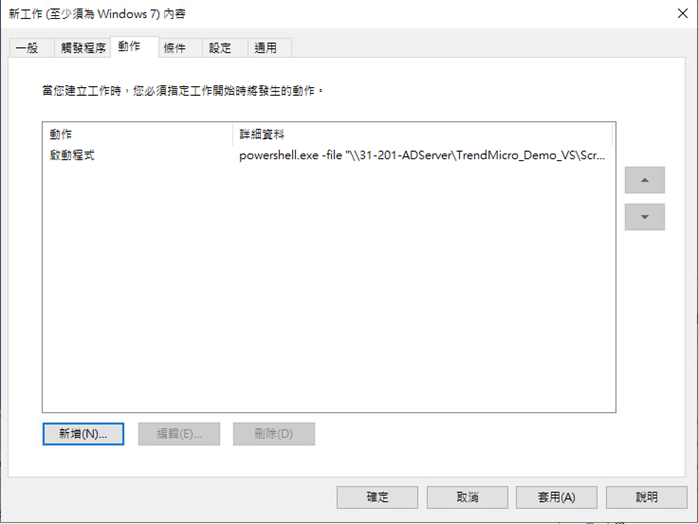
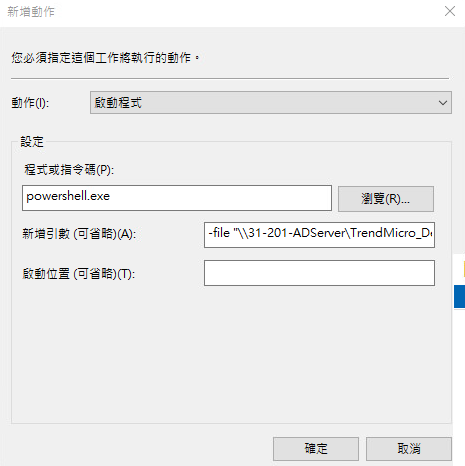
將 GPO 部署後就可以看到端點具有對應的排程

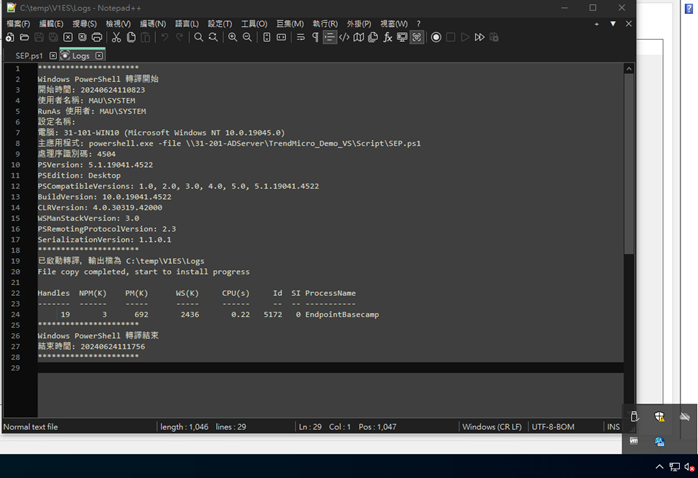
安裝完成的 Logs 參考
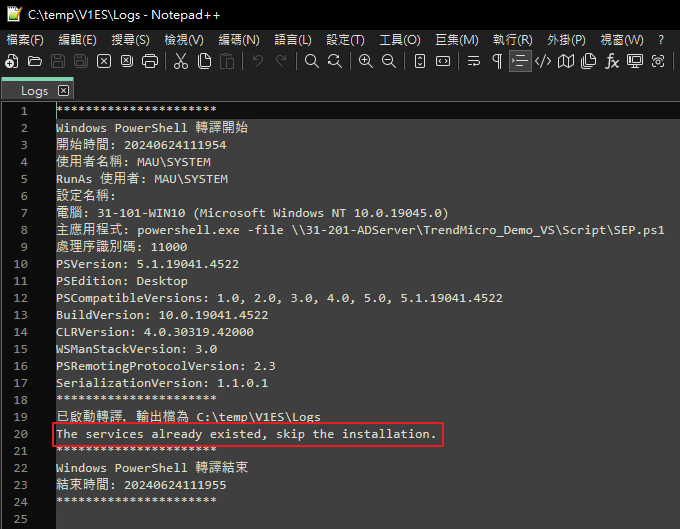
偵測到端點已經有 SEP 或是 SWP 的 Logs 參考
macOS
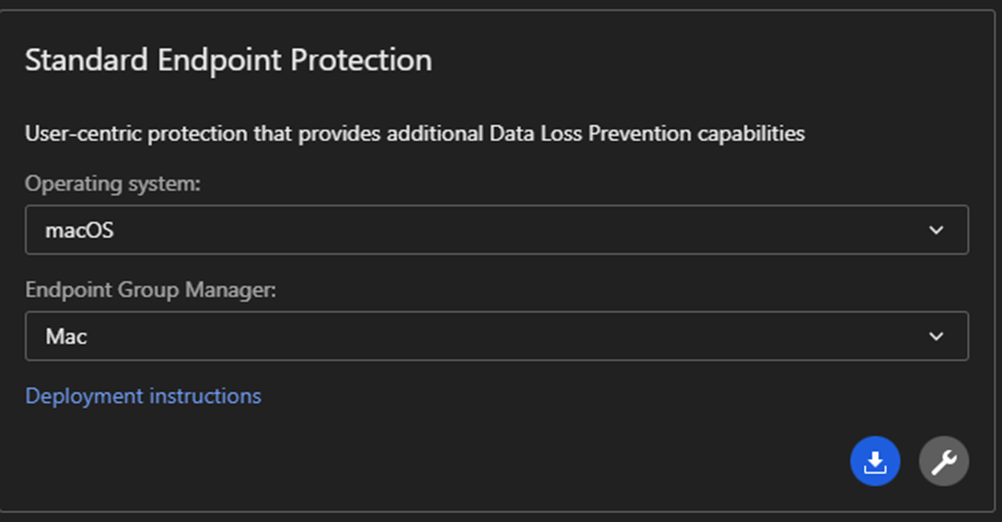
請至 Endpoint Inventory 點擊 Agent Installer,在彈出的右側欄
找到 Standard Endpoint Protection (SEP) 區塊,依序完成以下設定後下載 Agent Installer:
- Operating system:選擇對應的作業系統
- Endpoint Group Manager (EGM):選擇端點歸屬的 Endpoint Group
- Agent installer proxy:
- 此選項僅影響「安裝過程」中的連線,與 Agent 安裝完成後的日常運作設定 (Runtime Proxy Settings) 無關。
- 預設為 Use Agent Installer Proxy Settings 依序測試所有已知 Proxy 並找到可用的,順序參考:Agent Installer Proxy Settings
- 僅在需強制指定安裝期間的連線通道時才需更改。
- 點擊右下角的 下載圖示 (Download) 取得安裝檔。
點擊 endpoint_basecamp.pkg 安裝

點擊 繼續
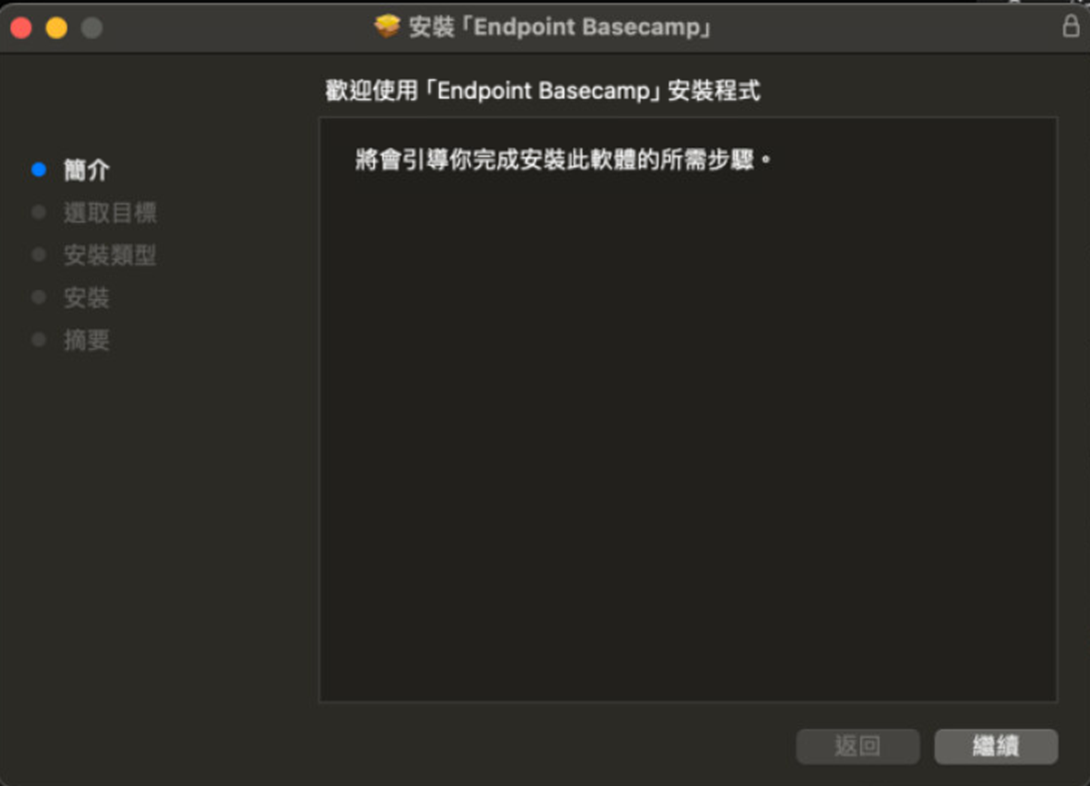
點擊 安裝
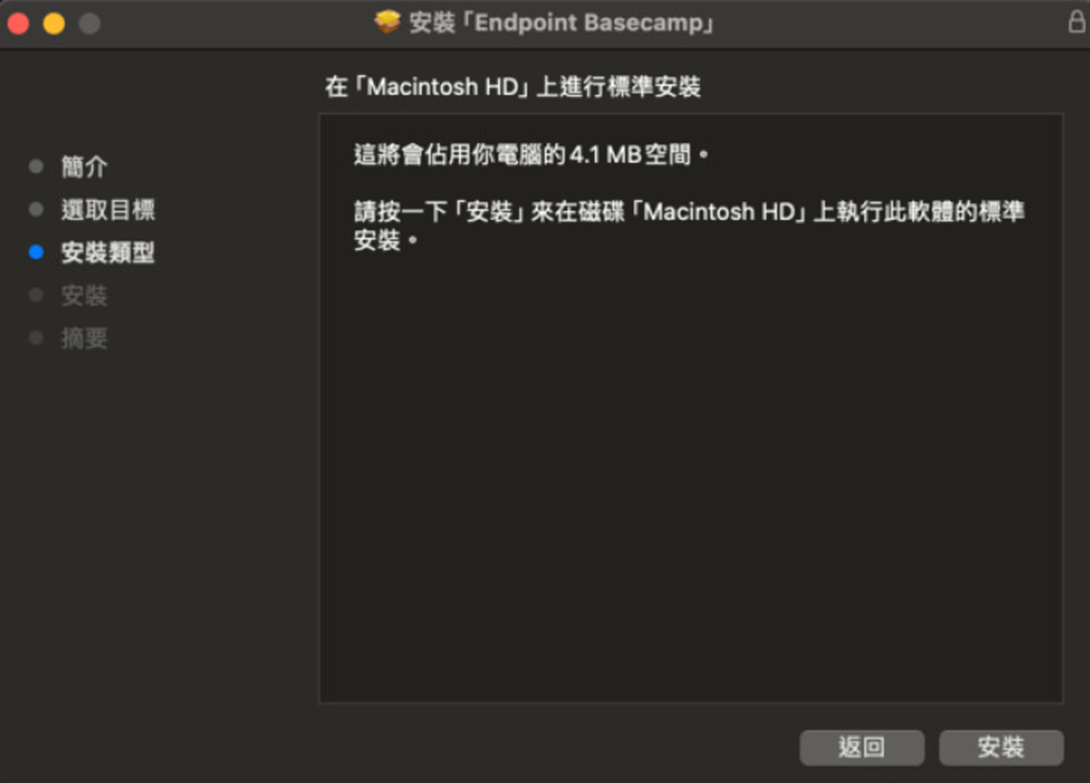
輸入密碼並點擊 安裝軟體
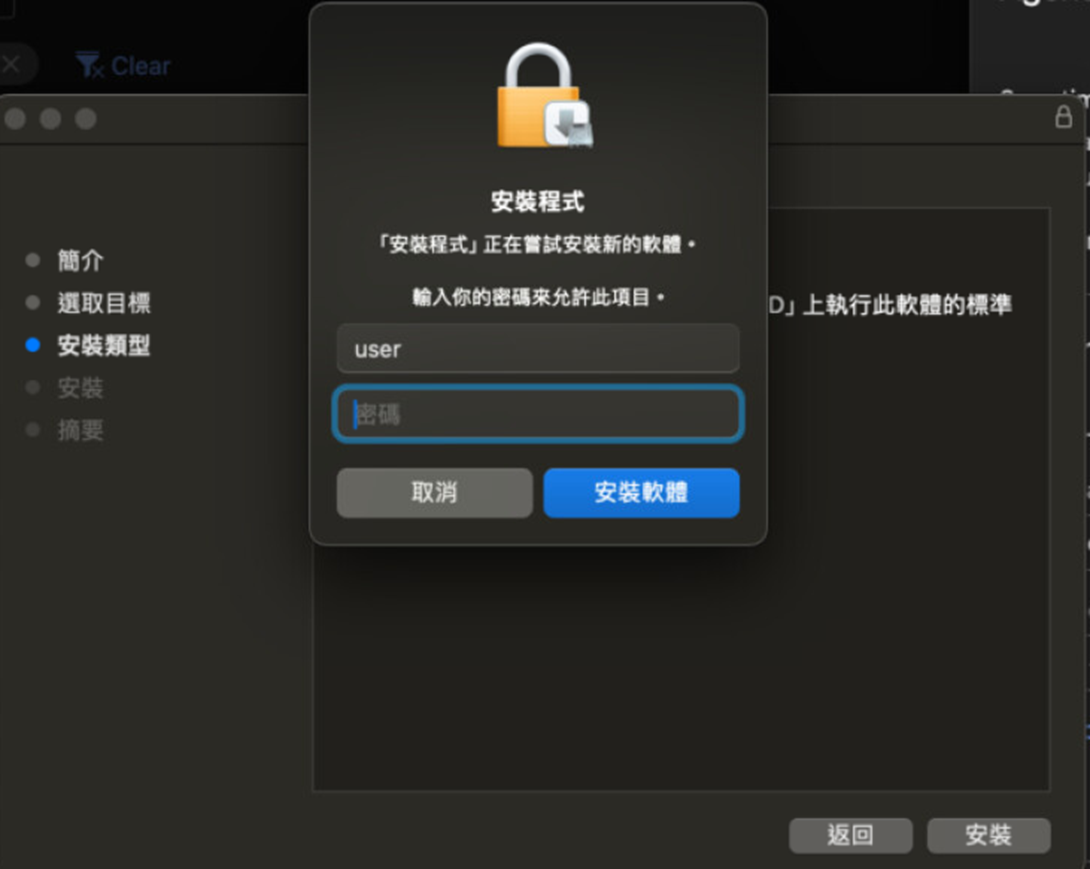
完成安裝
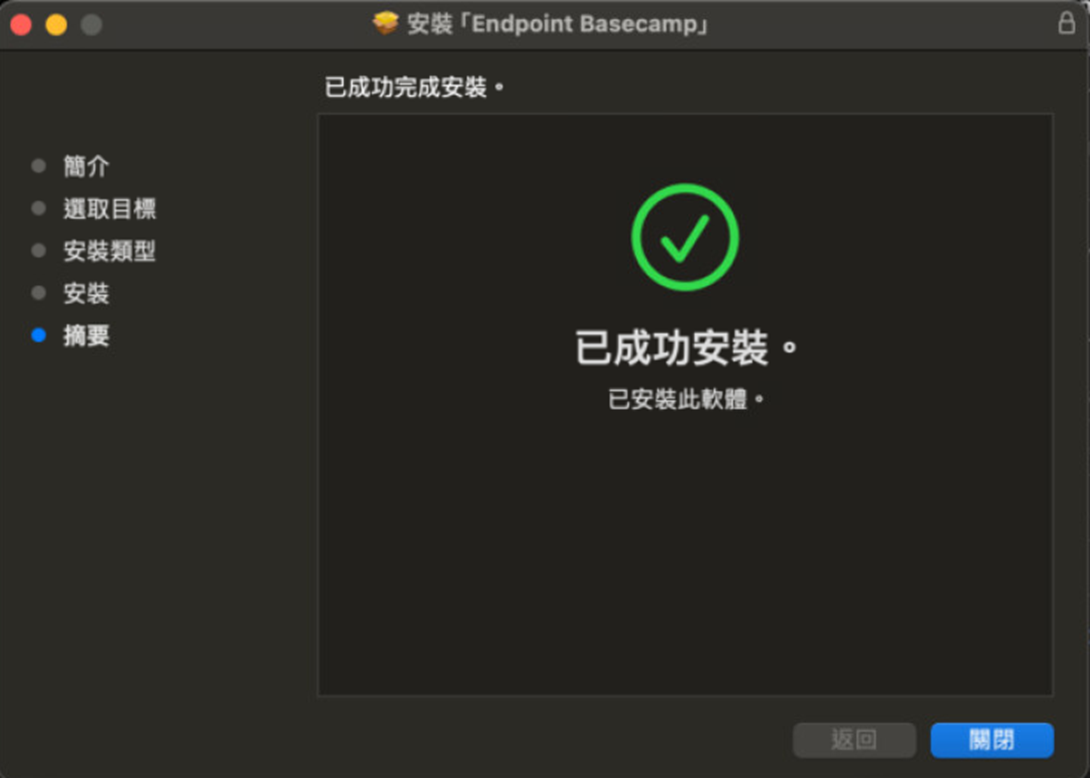
彈出需要權限的視窗
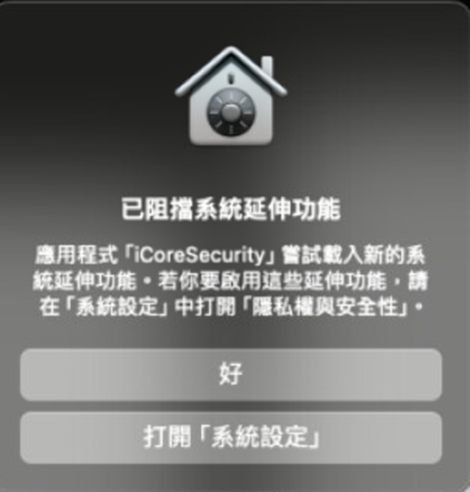
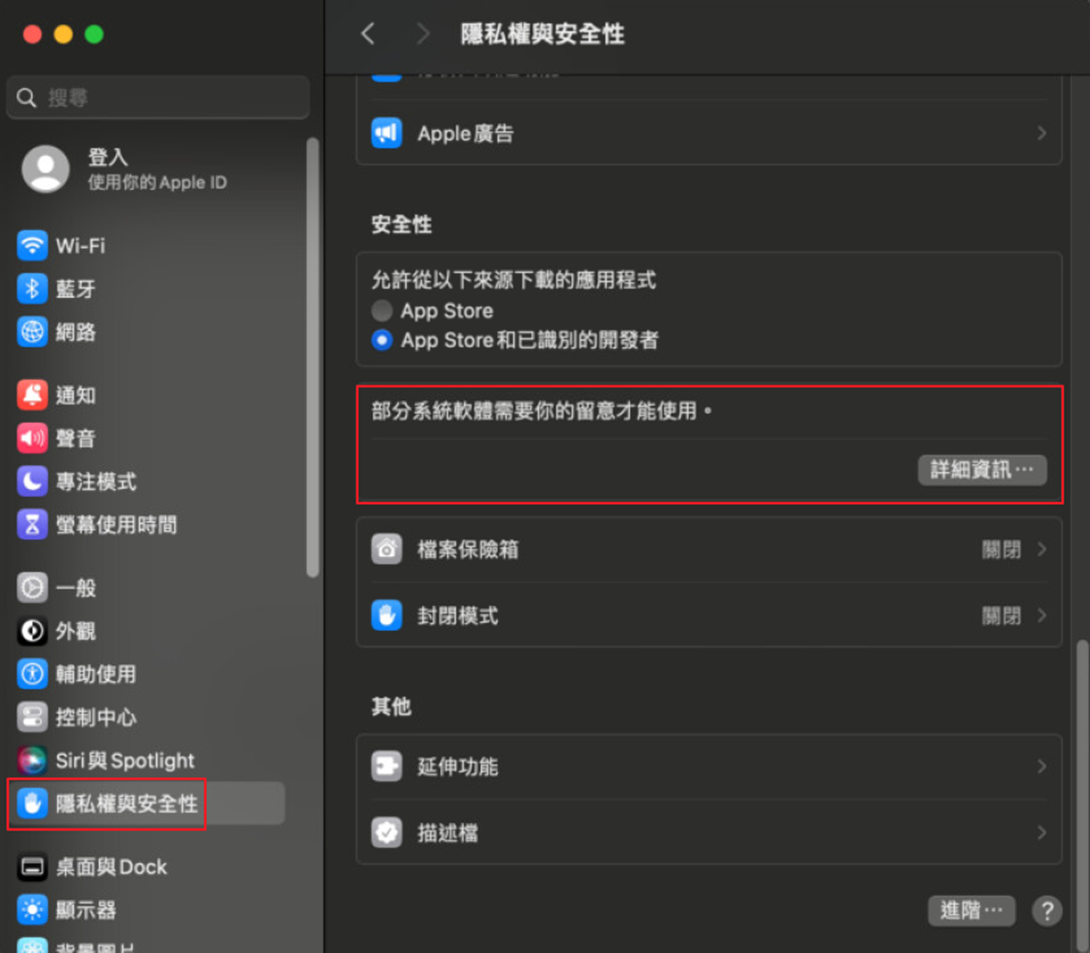
點擊該按鈕後將打開 隱私權與安全性 找到該頁面中的
部分系統需要你得留意才能使用。 點擊旁邊的 詳細資訊
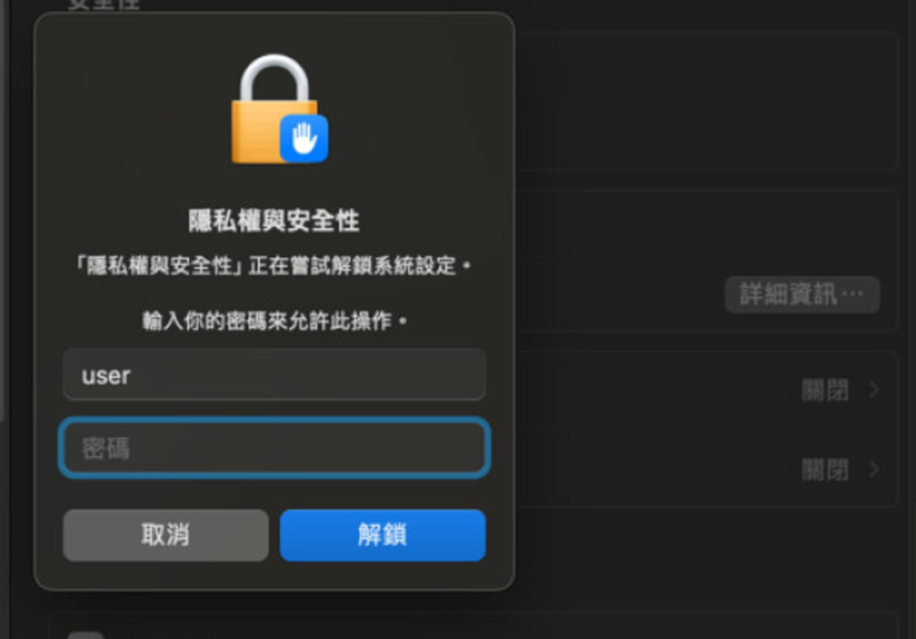
輸入密碼
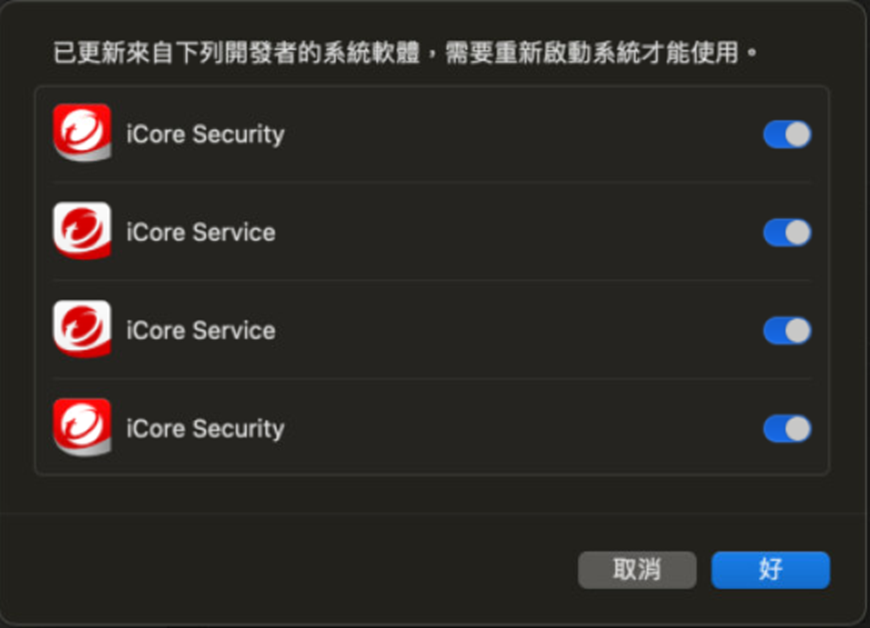
允許 iCore Security 與 iCore Service
允許 iCoreService 過濾網路流量
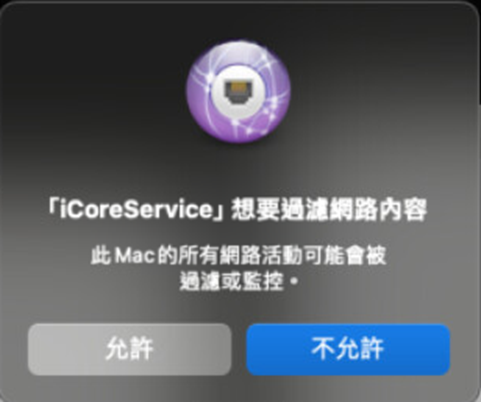
完畢後繼續允許 Endpoint Sensor 與 Security Agent 的權限
Note
這些應該會跟已阻擋系統延伸功能的通知一起出現
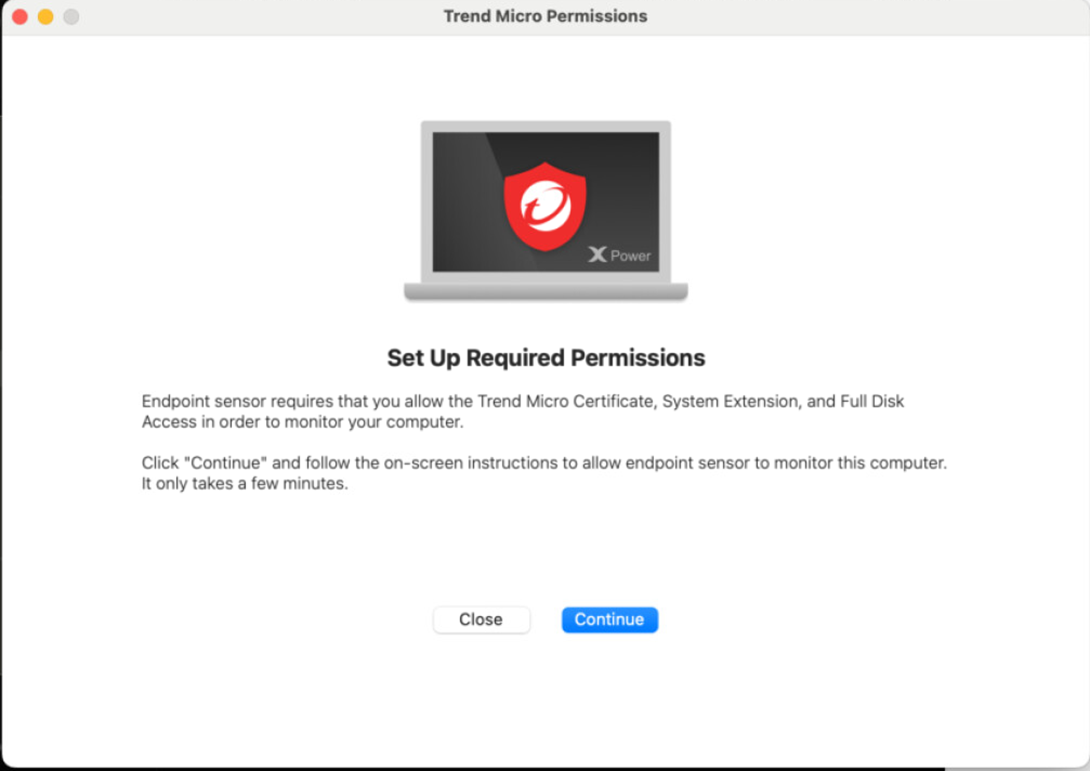
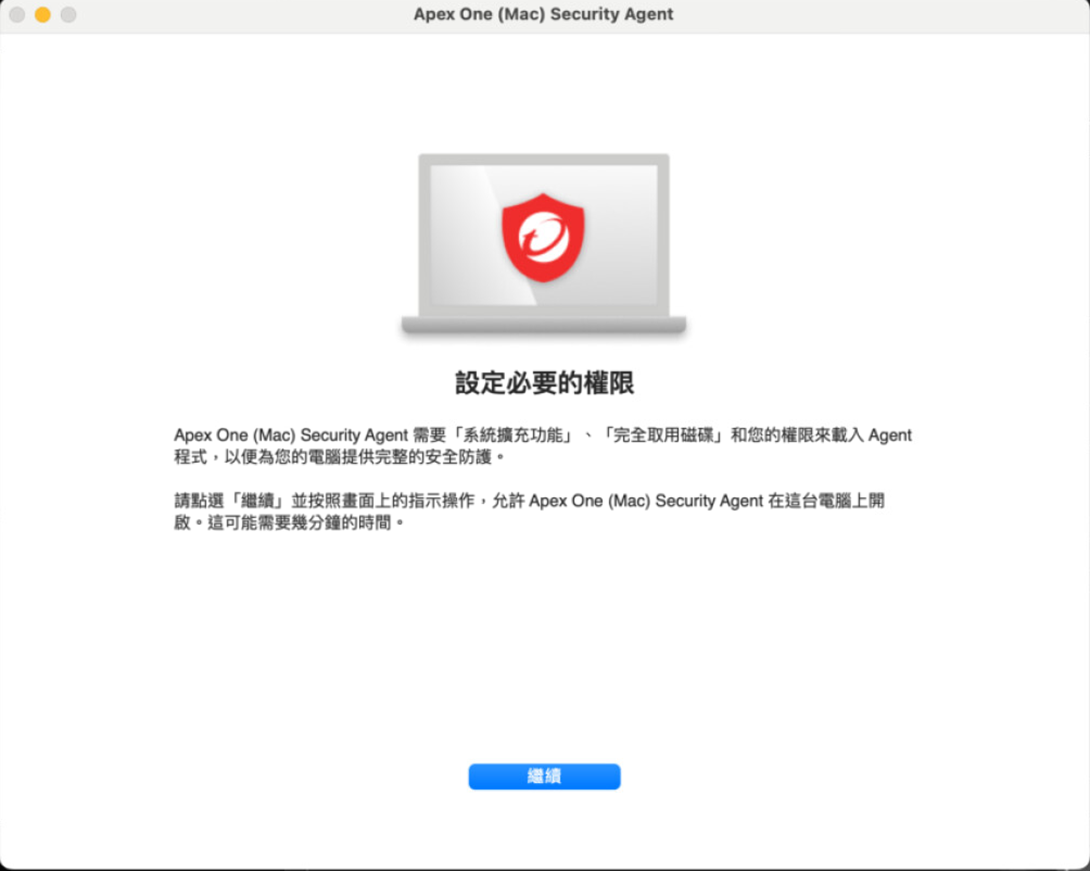
首先點擊 Endpoint Sensor 的 Continue 在接下來的 Allow System
Extension
點擊 Open Privacy & Security 這應該會導向到稍早允許系統延伸功能的位置
如果一開始沒有跳被阻擋的系統延伸功能的通知,可以由此導向到該位置。
設定完成後,點擊 Continue 繼續到下一個 Full Disk Access 權限
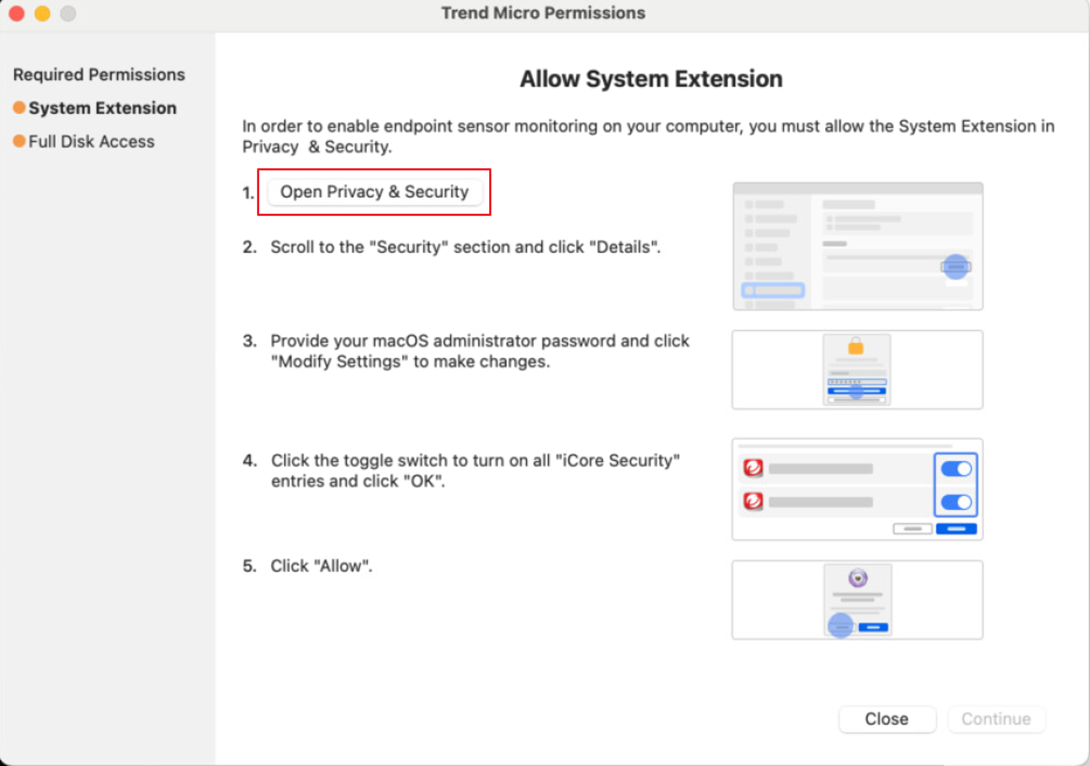
在 Allow Full Access 點擊 Open Privacy & Security
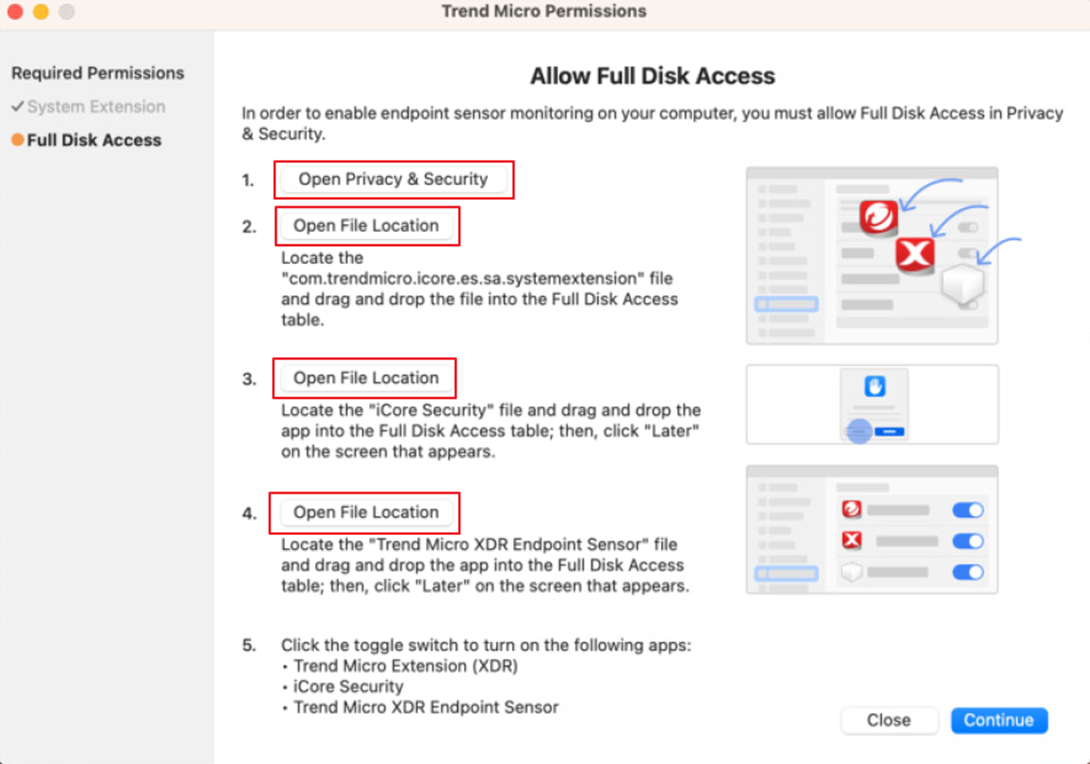
會導向到 完全取用磁碟 的位置,繼續依照順序點擊 Open File Location
並把彈出視窗中的檔案一個一個拉進 完全取用磁碟 的選單中
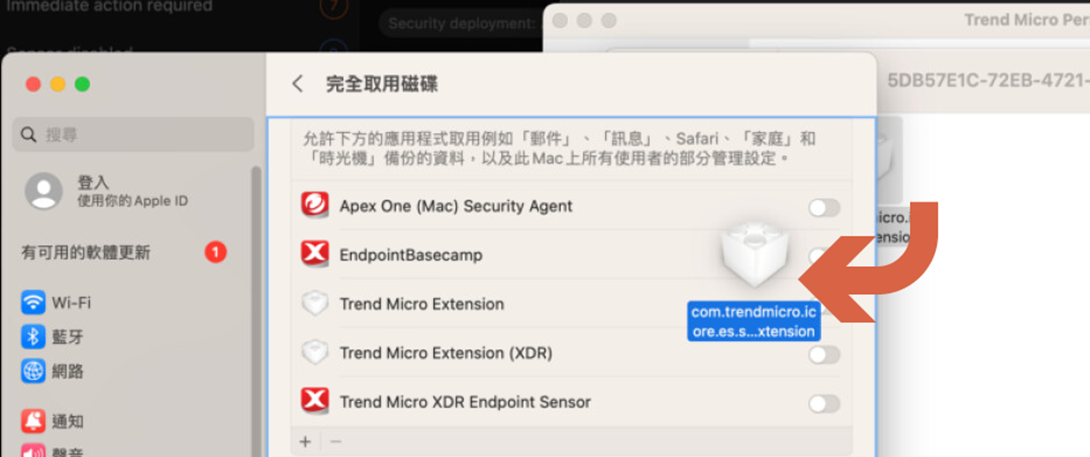
完成後連同 Security Agent 的權限一起允許
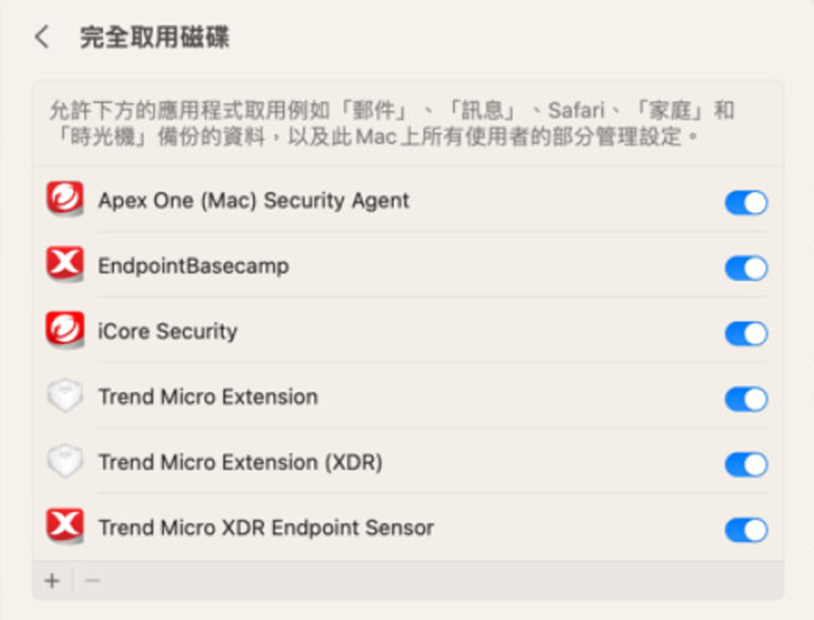
完成後,等待程式重新啟動應不再看見需要權限的通知

Server & Workload Protection (SWP)
Windows
直接安裝
請至 Endpoint Inventory 點擊 Agent Installer,在彈出的右側欄
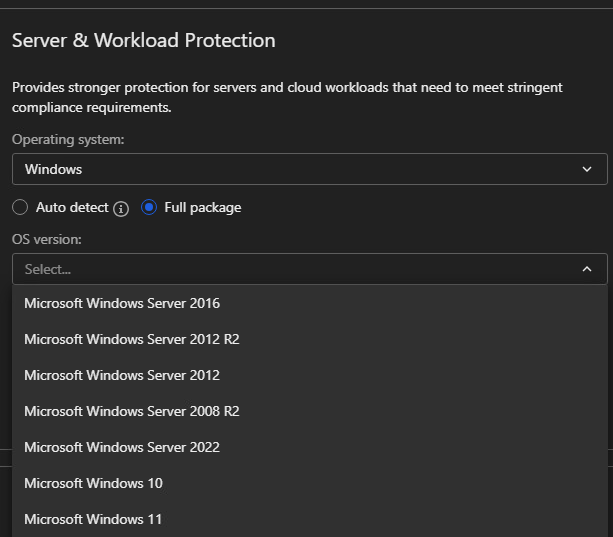
找到 Server & Workload Protection 區塊,依序完成以下設定後下載 Agent Installer:
- Operating system:選擇對應的作業系統。
- Installation Package Type:
- Auto detect:輕量安裝檔。執行時會自動偵測系統架構並下載對應元件,適合頻寬充足的環境。
- Full package:完整安裝檔。檔案較大,內含所有必要元件,適合頻寬受限的環境使用。
- Protection Manager:選擇端點歸屬的管理伺服器或策略群組。
- Agent installer proxy:
- 此選項僅影響「安裝過程」中的連線,與 Agent 安裝完成後的日常運作設定 (Runtime Proxy Settings) 無關。
- 預設為 Use Agent Installer Proxy Settings 依序測試所有已知 Proxy 並找到可用的,順序參考:Agent Installer Proxy Settings
- 僅在需強制指定安裝期間的連線通道時才需更改。
- 點擊右下角的 下載圖示 取得安裝檔。
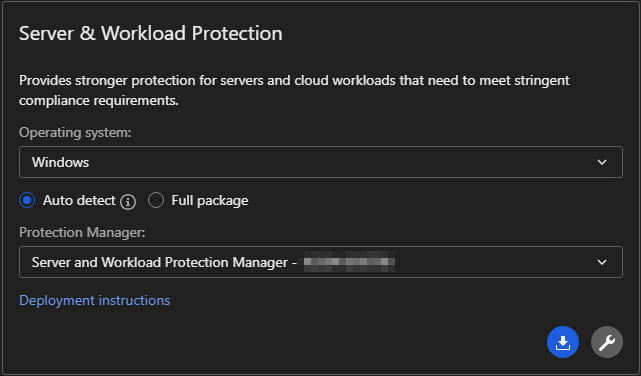
Auto detect 在偵測到版本之後會需要額外下載元件,會需要更多的網路資源
Full package 會需要自行選擇版本並拿到對應的作業系統部署
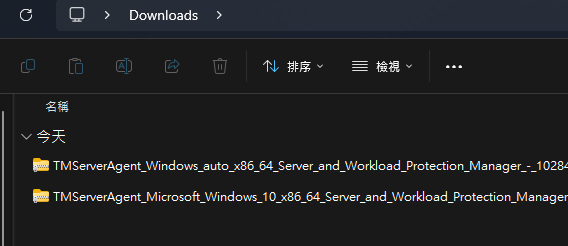
下載取得 agent installer 如果是 Auto detect 的可以看到 auto 在檔名上
反之,則可以看到對應的作業系統版本在檔名上
Warning
注意:解壓縮取得的檔案請保持它們的名稱與相對位置
請勿重新命名、變更或移動安裝套件中的任何檔案或資料夾,避免安裝過程中找不到檔案。
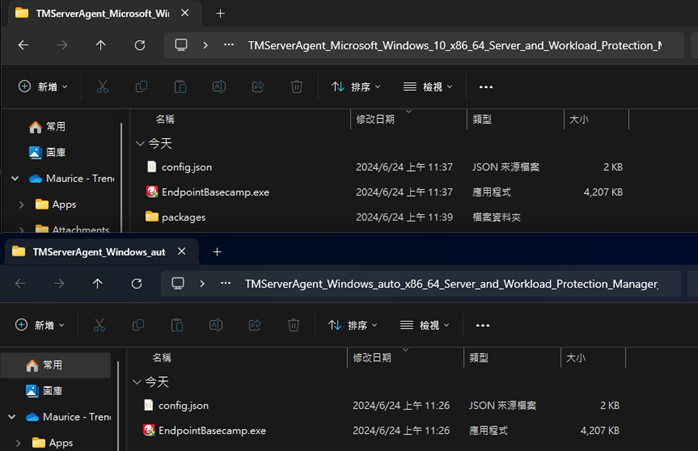
Auto detect 會相較於 Full package 少了 packages 的資料夾
以系統管理員身分執行 EndpointBasecamp.exe 並等待安裝完成
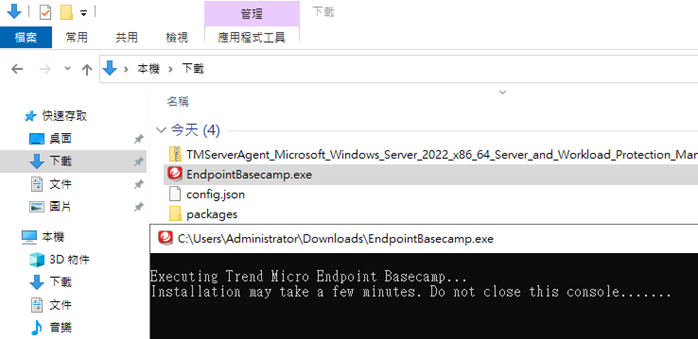
安裝完成後即可在 Endpoint Inventory 看到該端點

同時該端點右下方也會出現圖示
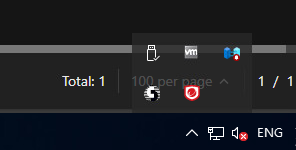
如果沒有設定 Policy 也沒有預設的 Policy
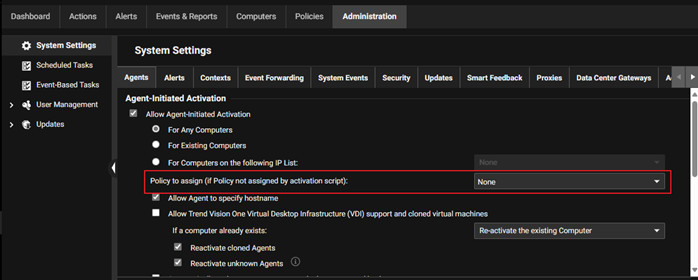
請到 Computers 設定 Policy 來啟用所需要的功能

Deployment Script
此功能允許您生成自動化 PowerShell 腳本,透過 CLI 下載並安裝 Agent
適合需要大量部署或整合至第三方派送系統(如 SCCM, Ansible)的 Windows 環境。
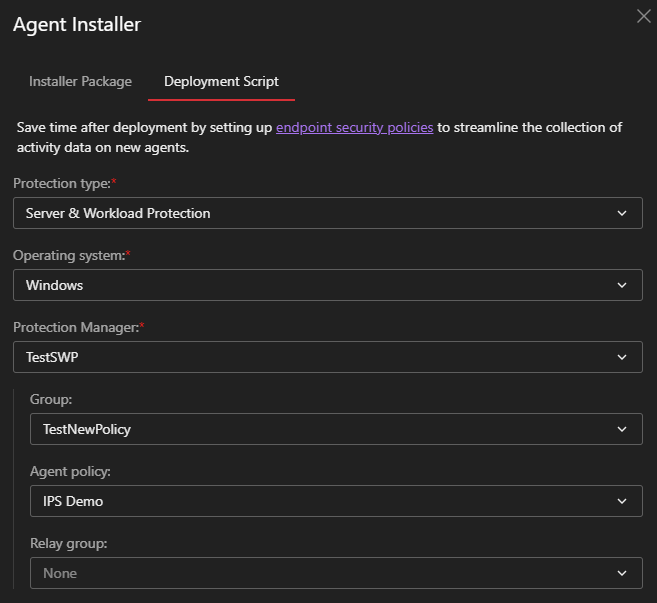
請至 Endpoint Inventory 點擊 Agent Installer,在彈出的右側欄上方切換至 Deployment
Script 頁籤,並依序完成以下設定:
- Protection type:選擇 Server & Workload Protection。
- Operating system:選擇 Windows。
- Protection Manager:選擇該端點的管理伺服器。
- Group:指定 Agent 安裝完成後,回報的 Group 位置。
- Agent policy:選擇安裝後要套用的安全性策略。
- Relay group:指定 Agent 後續更新時使用的 Relay 來源群組。
- Installer package download source:
- Agent installer proxy:
- 此選項僅影響「安裝過程」中的連線,與 Agent 安裝完成後的日常運作設定 (Runtime Proxy Settings) 無關。
- 預設選擇 Direct connect。
- Security Validation:
- 建議勾選 Validate Trend Vision One server TLS certificate 與 Validate the
digital signature,以防止腳本執行過程中遭受中間人攻擊或下載到被竄改的檔案。
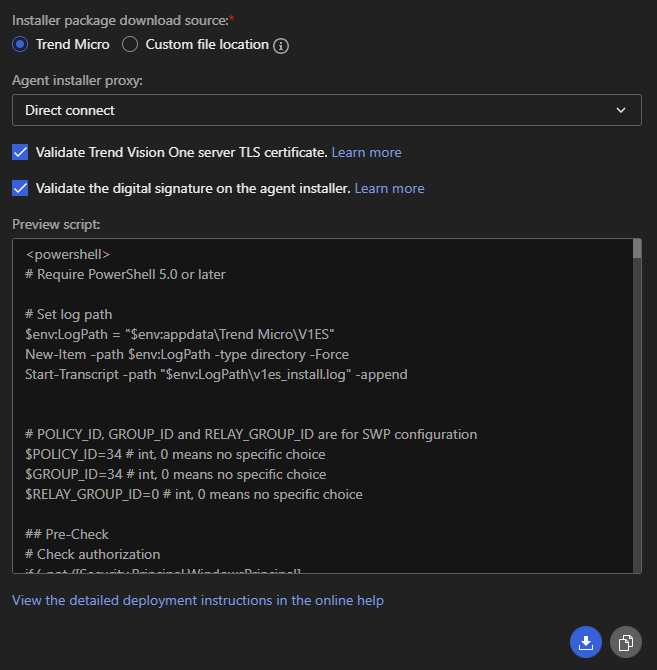
- 執行腳本:
- 設定完成後,下方 Preview script 會自動更新內容。
- 點擊右下角的 複製圖示 或 下載圖示 取得
.ps1 檔案。
- 在目標 Windows 主機上,以系統管理員身分開啟 PowerShell 並執行該腳本即可開始安裝。
Linux
直接安裝
請至 Endpoint Inventory 點擊 Agent Installer,在彈出的右側欄
找到 Server & Workload Protection 區塊,依序完成以下設定後下載 Agent Installer:
- Operating system:選擇 Linux。
- Installation Package Type:
- Auto detect:輕量安裝檔。執行時會自動偵測 Linux 發行版與核心版本並下載對應元件,適合頻寬充足的環境。
- Full package:完整安裝檔。檔案較大,內含特定發行版的所有必要元件,適合頻寬受限的環境使用。
- OS architecture:依據主機硬體規格選擇 64-bit (x86-64) 或 ARM64
(AArch64)。
- Protection Manager:選擇端點的管理伺服器。
- Agent installer proxy:
- 此選項僅影響「安裝過程」中的連線,與 Agent 安裝完成後的日常運作設定 (Runtime Proxy Settings) 無關。
- 預設為 Use Agent Installer Proxy Settings 依序測試所有已知 Proxy 並找到可用的,順序參考:Agent Installer Proxy Settings
- 僅在需強制指定安裝期間的連線通道時才需更改。
- 點擊右下角的 下載圖示 取得安裝檔。
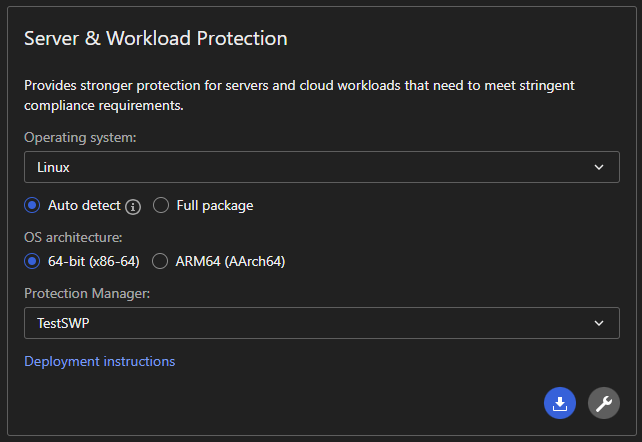
Full package 會需要自行選擇版本並拿到對應的作業系統部署

下載取得 Agent Installer 如果是 Auto detect 的可以看到 auto 的檔名
反之,則可以看到對應的作業系統版本在檔名上

Warning
注意:解壓縮取得的檔案請保持它們的名稱與相對位置
請勿重新命名、變更或移動安裝套件中的任何檔案或資料夾,避免安裝過程中找不到檔案。
Auto detect 會相較於 Full package 少了 packages 的資料夾


cd 移動到解壓縮目的資料夾,輸入 sudo ./tmxbc install

安裝完成後可以用 ps aux | grep tmxbc | grep -v grep 看到服務

Tip
如果服務有啟動但是沒有回報到 Endpoint Inventory 請按照下列順序初步檢查
- agent 與 Vision One 之間的時間差是否超過了三十分鐘
可以嘗試透過 date; curl "http://worldtimeapi.org/api/timezone/<customer_timezone>
檢查網際網路時間與裝置時間的差距
例如:date;curl http://worldtimeapi.org/api/timezone/Asia/Taipei

- 是否已經依照建議打開防火牆
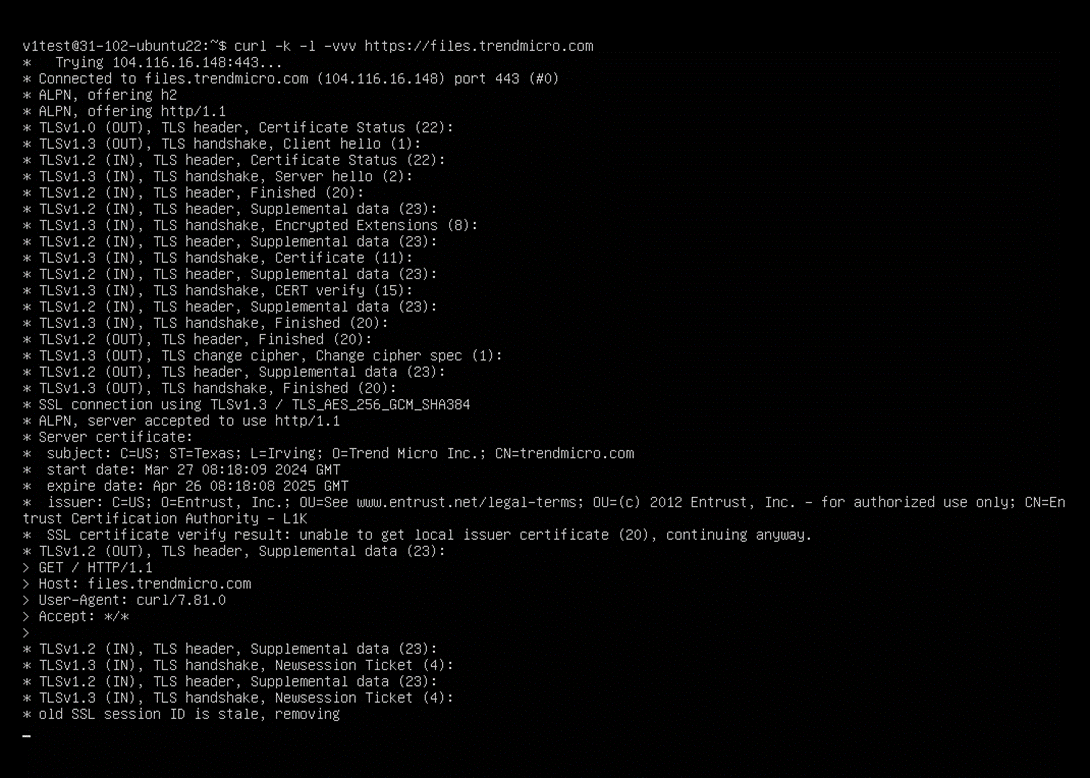
- 是否能夠存取
https://files.trendmicro.com
- 如果沒有 proxy,使用
curl -k -l -vvv https://files.trendmicro.com
- 如果有 proxy,使用
curl -k -l -vvv -X proxy_url:port https://files.trendmicro.com
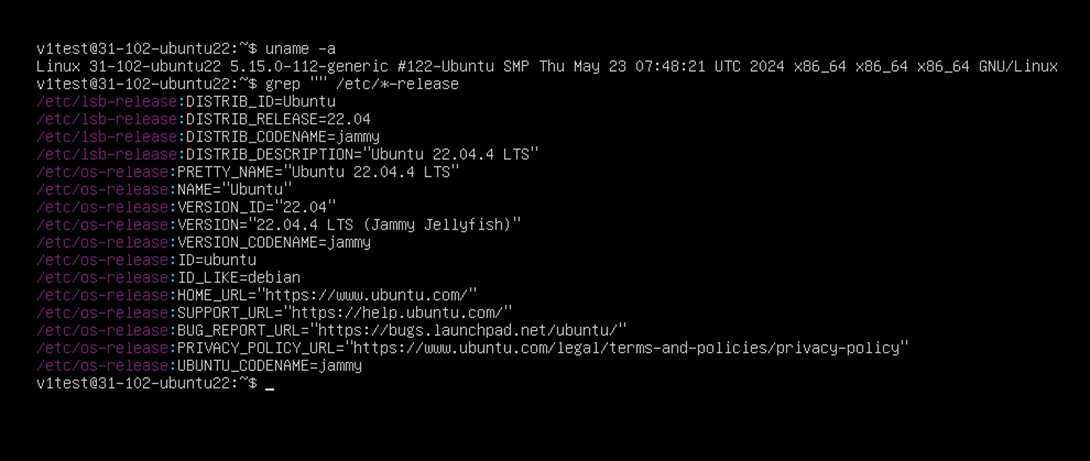
- Kernel 資訊
uname -r
grep "" /etc/*-release
5. 確認是否有 Linux Secure Boot(如果是 Endpoint Sensor 啟用有問題)
如果有 Linux Secure Boot 是否有 Enrolling Trend Micro public key
Note
如果初步檢查仍具問題需要收集下列資料
XBC debug log
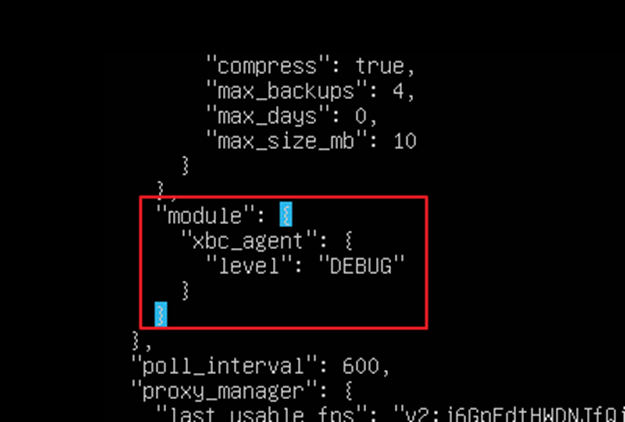
- 修改設定啟用 debug
sudo vi /opt/TrendMicro/EndpointBasecamp/etc/.conf
- 重新啟動服務
systemctl restart tmxbc
- 重新啟動服務後確認
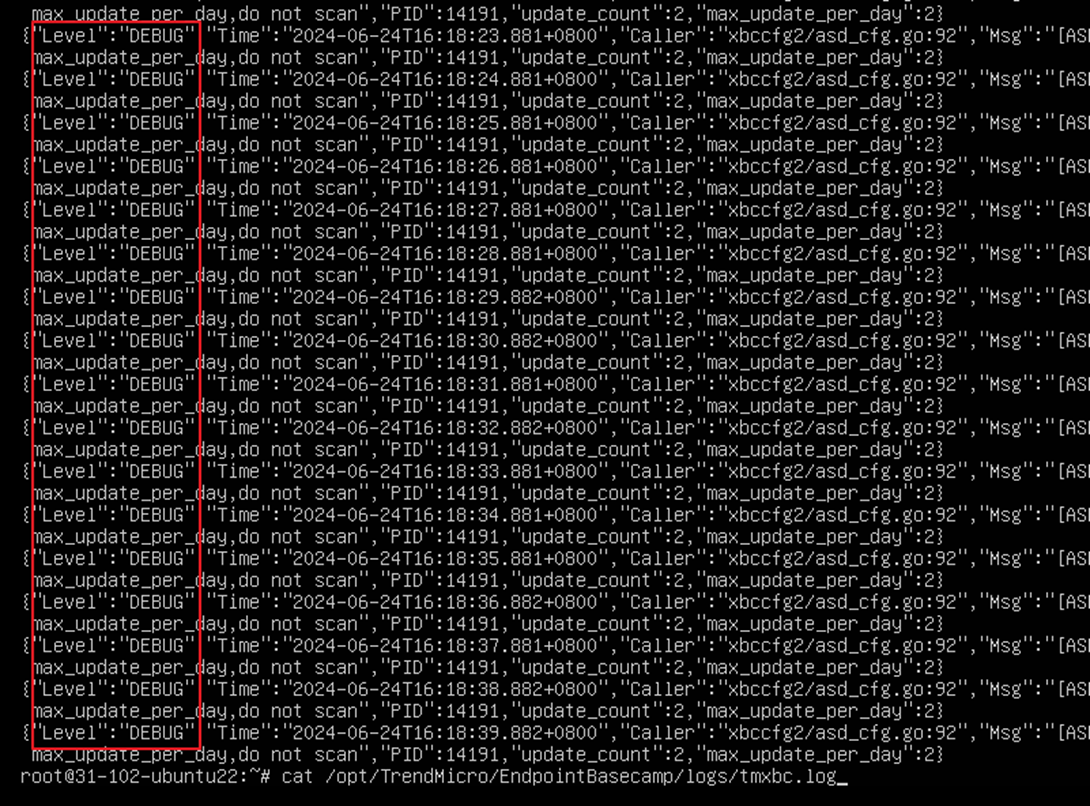
/opt/TrendMicro/EndpointBasecamp/logs/tmxbc.log 是否已經看到 Level
為 DEBUG
- 輸入下列指令將
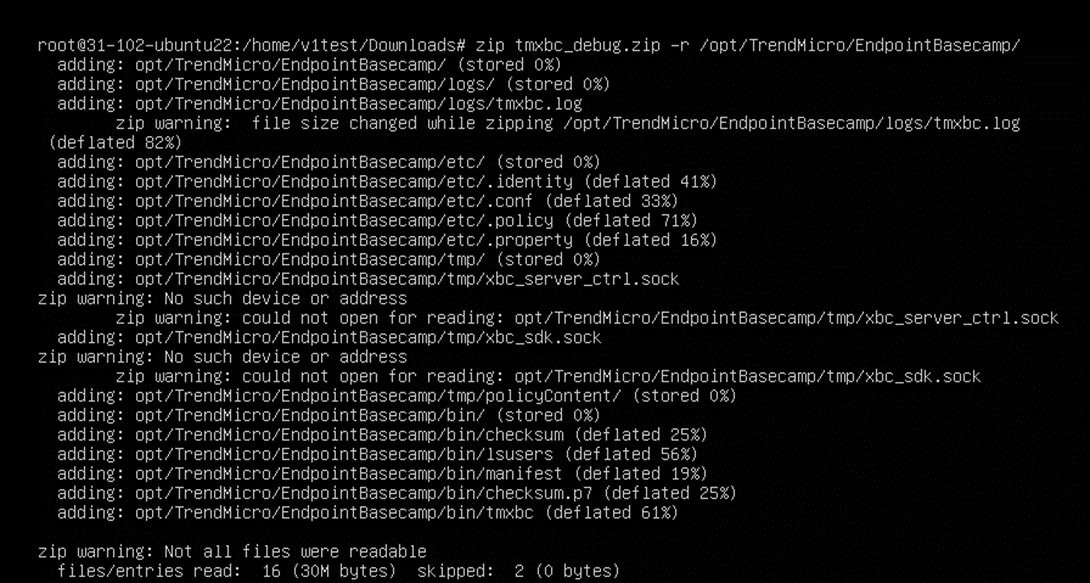
/opt/TrendMicro/EndpointBasecamp/ 壓縮收集
zip tmxbc_debug.zip -r /opt/TrendMicro/EndpointBasecamp/
diagnostic package
如果是 Endpoint Sensor 啟用有問題請額外收集 diagnostic package
- 輸入下列指令產生 diagnostic package
sudo /opt/TrendMicro/vls_agent/vlsa_control -d
- 收集下列資料夾與檔案
/var/opt/TrendMicro/vls_agent/diag
/var/opt/TrendMicro/vls_agent/xbc.ini
/var/opt/TrendMicro/vls_agent/diag/meta.json
Deployment Script
此功能允許您生成自動化 Bash 腳本 (Shell Script),透過 CLI 下載並安裝 Agent,適合自動化部署或大量派送至 Linux 伺服器群。
請至 Endpoint Inventory 點擊 Agent Installer,在彈出的右側欄上方切換至 Deployment
Script 頁籤,並依序完成以下設定:
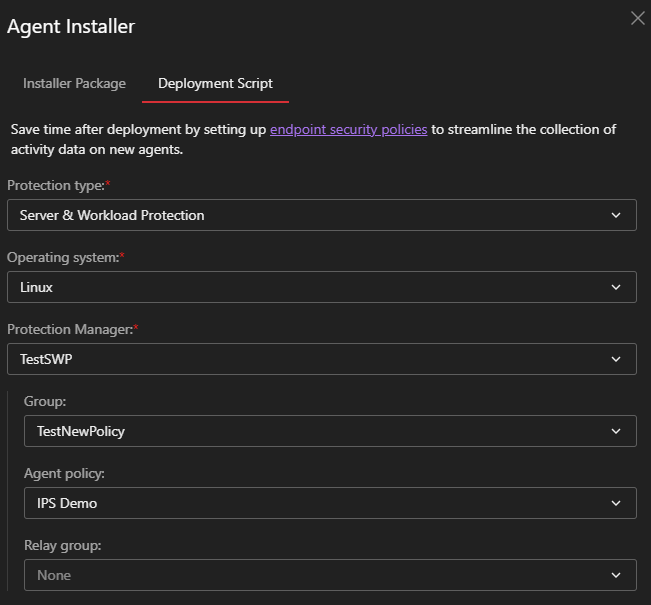
- Protection type:選擇 Server & Workload Protection。
- Operating system:選擇 Linux。
- Protection Manager:選擇該端點的管理伺服器。
- Group:指定 Agent 安裝完成後,回報的 Group 位置。
- Agent policy:選擇安裝後要套用的安全性策略。
- Relay group:指定 Agent 後續更新時使用的 Relay 來源群組。
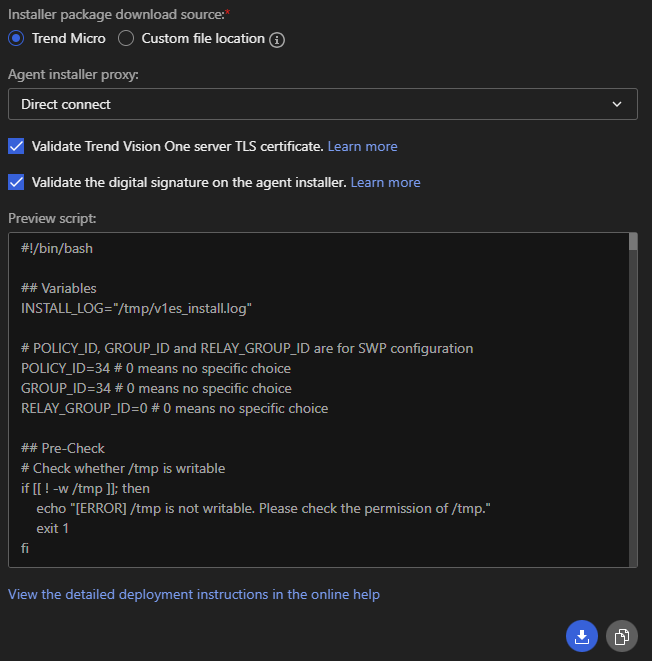
- Installer package download source:
- Agent installer proxy:
- 此選項僅影響「安裝過程」中的連線,與 Agent 安裝完成後的日常運作設定 (Runtime Proxy Settings) 無關。
- 預設選擇 Direct connect。
- Security Validation:
- 建議勾選 Validate Trend Vision One server TLS certificate 與 Validate the
digital signature,以防止腳本執行過程中遭受中間人攻擊或下載到被竄改的檔案。
- 執行腳本:
- 設定完成後,下方 Preview script 會自動更新內容。
- 點擊右下角的 複製圖示 或 下載圖示 取得
.sh 檔案。
- 在目標 Linux 主機上,以 Root 權限 執行該腳本即可開始安裝:
sudo chmod +x ./<Script名稱>.sh
sudo ./<Script名稱>.sh
Sensor Only
Windows
直接安裝
請至 Endpoint Inventory 點擊 Agent Installer,在彈出的右側欄
找到 Endpoint Sensor 區塊。此版本主要用於僅需要偵測與回應功能 (EDR/XDR),或需與現有第三方防毒軟體共存的環境。
依序完成以下設定後下載 Agent Installer:
- Operating system:選擇 Windows。
- OS architecture:依據主機硬體規格選擇 64-bit (x86-64)、32-bit
(x86) 或 ARM64 (AArch64)。
- Agent installer proxy:
- 此選項僅影響「安裝過程」中的連線,與 Agent 安裝完成後的日常運作設定 (Runtime Proxy Settings) 無關。
- 預設為 Use Agent Installer Proxy Settings 依序測試所有已知 Proxy 並找到可用的,順序參考:Agent Installer Proxy Settings
- 僅在需強制指定安裝期間的連線通道時才需更改。
- 點擊右下角的 下載圖示 取得安裝檔。
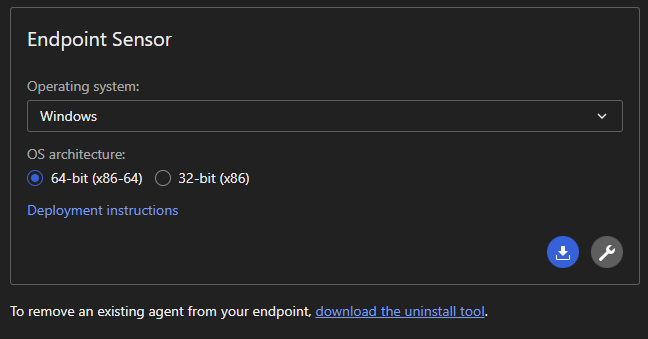
下載取得 TMSensorAgent_Windows_x86_64.zip
Warning
注意:解壓縮取得的檔案請保持它們的名稱與相對位置
請勿重新命名、變更或移動安裝套件中的任何檔案或資料夾,避免安裝過程中找不到檔案。
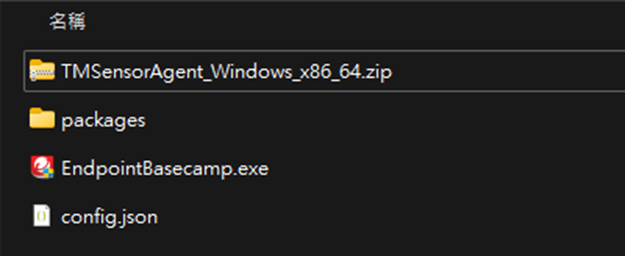
以系統管理員身分執行 EndpointBasecamp.exe 並等待安裝完成

安裝完成後即可在 Endpoint Inventory 看到該端點

macOS
直接安裝
請至 Endpoint Inventory 點擊 Agent Installer,在彈出的右側欄
找到 Endpoint Sensor 區塊。
依序完成以下設定後下載 Agent Installer:
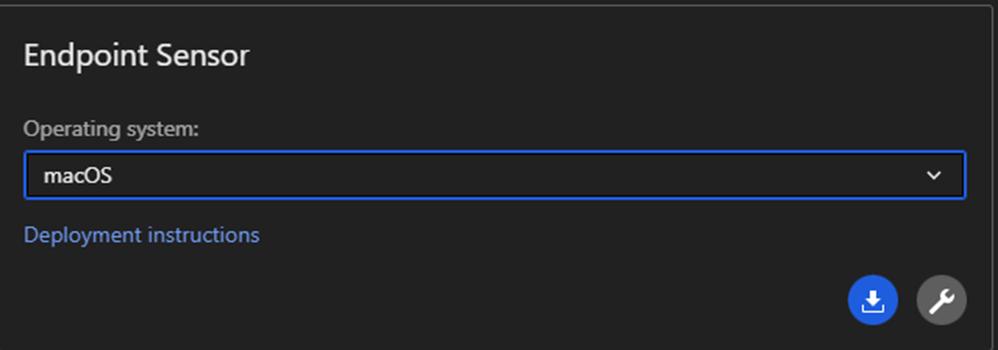
- Operating system:選擇 macOS。
- Agent installer proxy:
- 此選項僅影響「安裝過程」中的連線,與 Agent 安裝完成後的日常運作設定 (Runtime Proxy Settings) 無關。
- 預設為 Use Agent Installer Proxy Settings 依序測試所有已知 Proxy 並找到可用的,順序參考:Agent Installer Proxy Settings
- 僅在需強制指定安裝期間的連線通道時才需更改。
- 點擊右下角的 下載圖示 取得安裝檔。
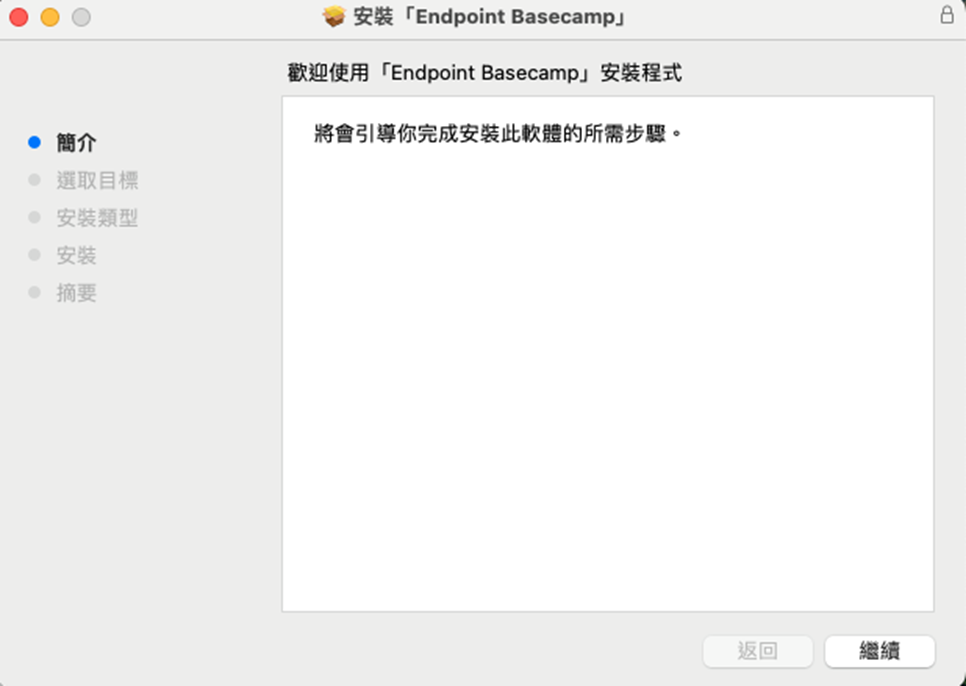
點擊 endpoint_basecamp.pkg 安裝
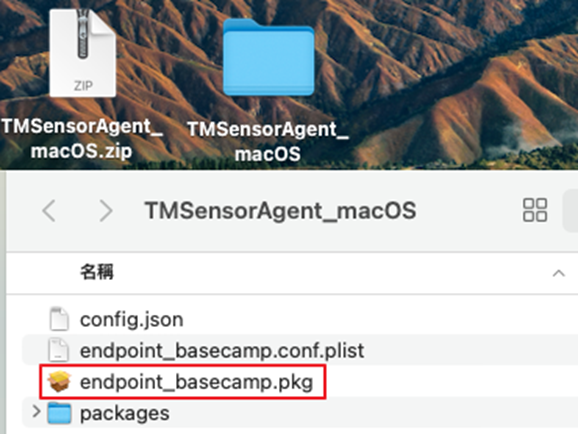
點擊 繼續
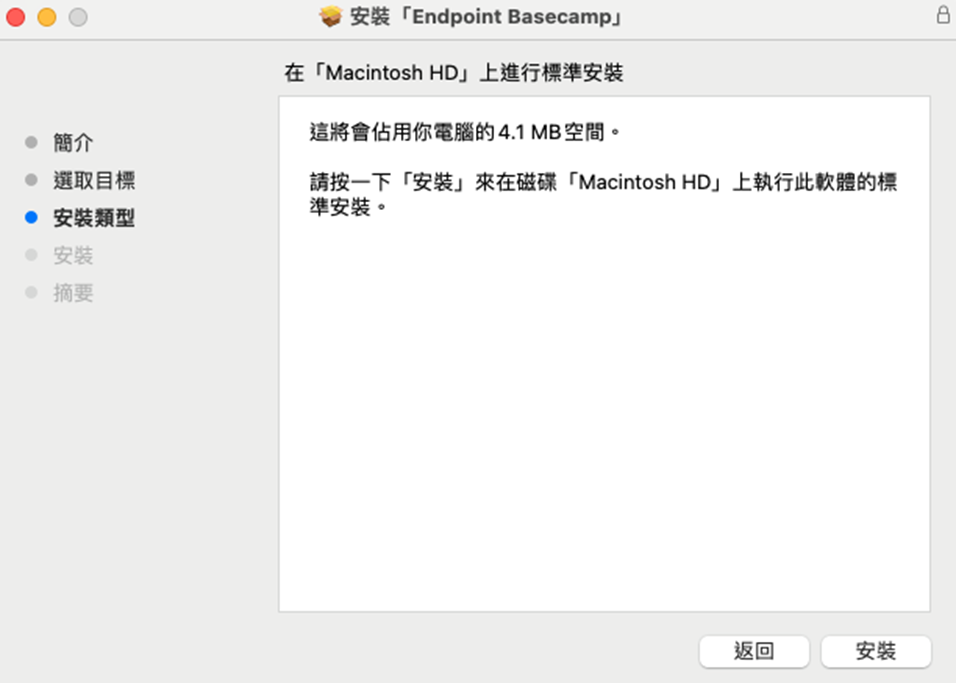
點擊 安裝
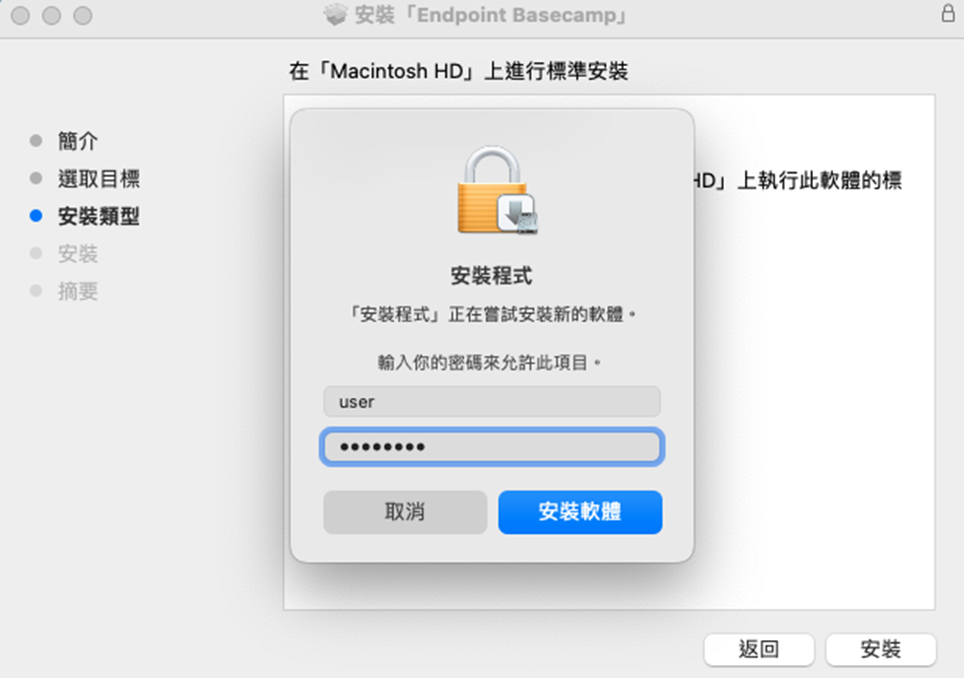
輸入密碼後按下 安裝軟體
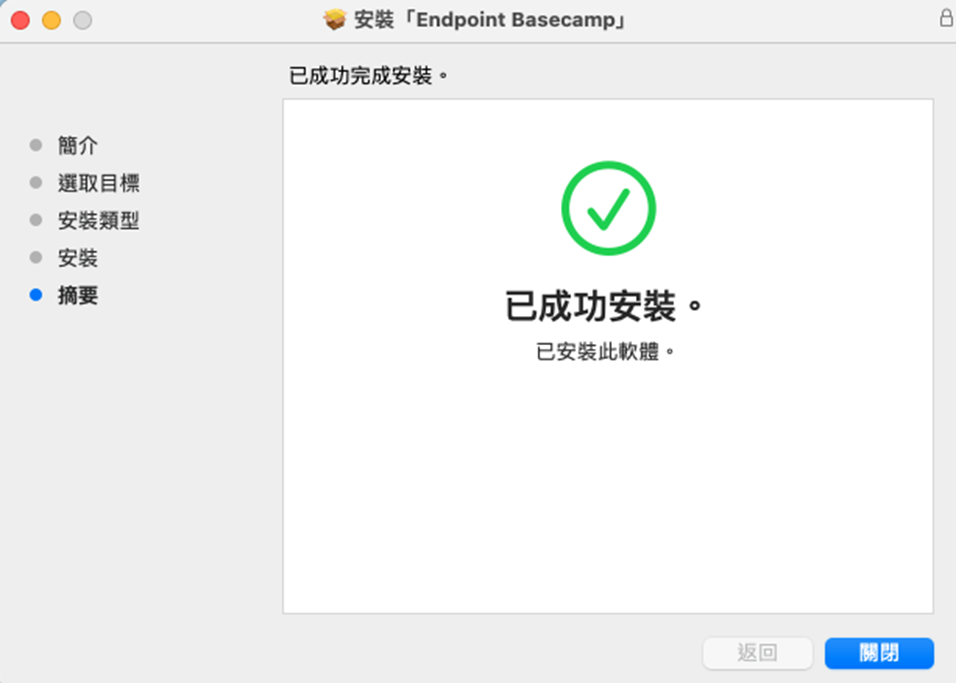
安裝完成
完成安裝後彈出需要權限的視窗
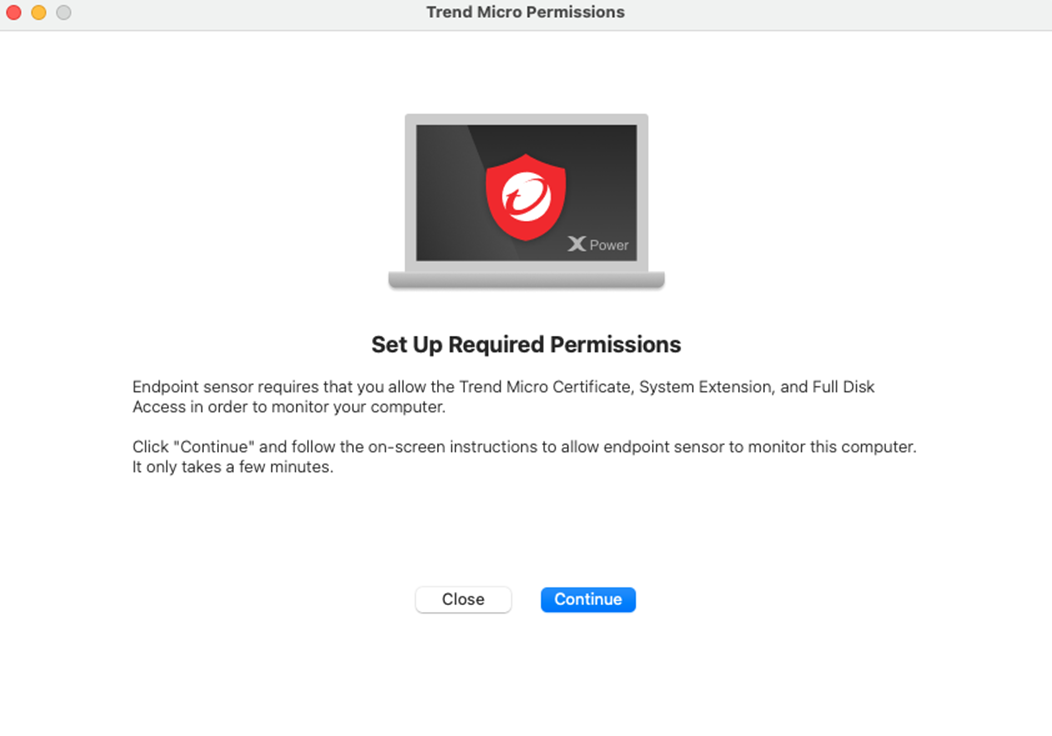
依照程式上面的說明給予權限,首先點擊 Open privacy & Security 的按鈕
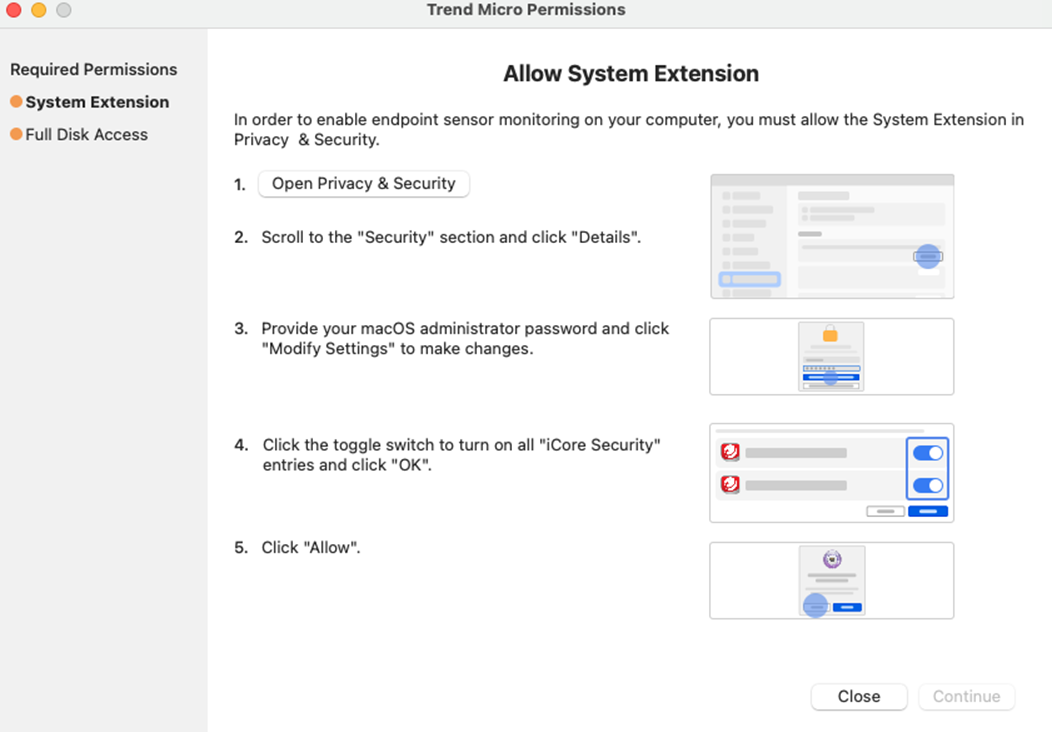
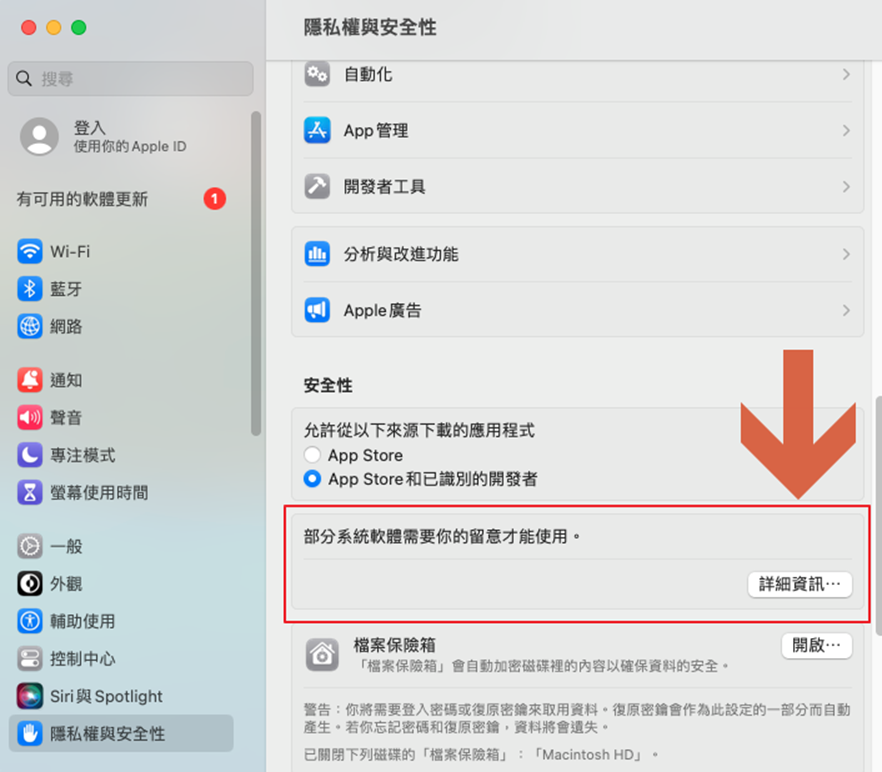
點擊該按鈕後將打開 隱私權與安全性 找到該頁面中的
部分系統需要你得留意才能使用。 點擊旁邊的 詳細資訊
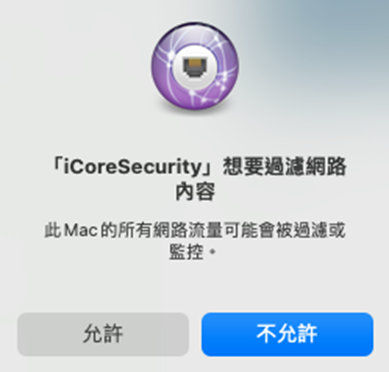
將彈出的視窗所需要的權限打開,按下 好

允許 iCoreSecurity 過濾網路內容
完成第一個步驟 System Extension 繼續開啟 Full Disk Access
點擊這個頁面的 Open privacy & Security 的按鈕
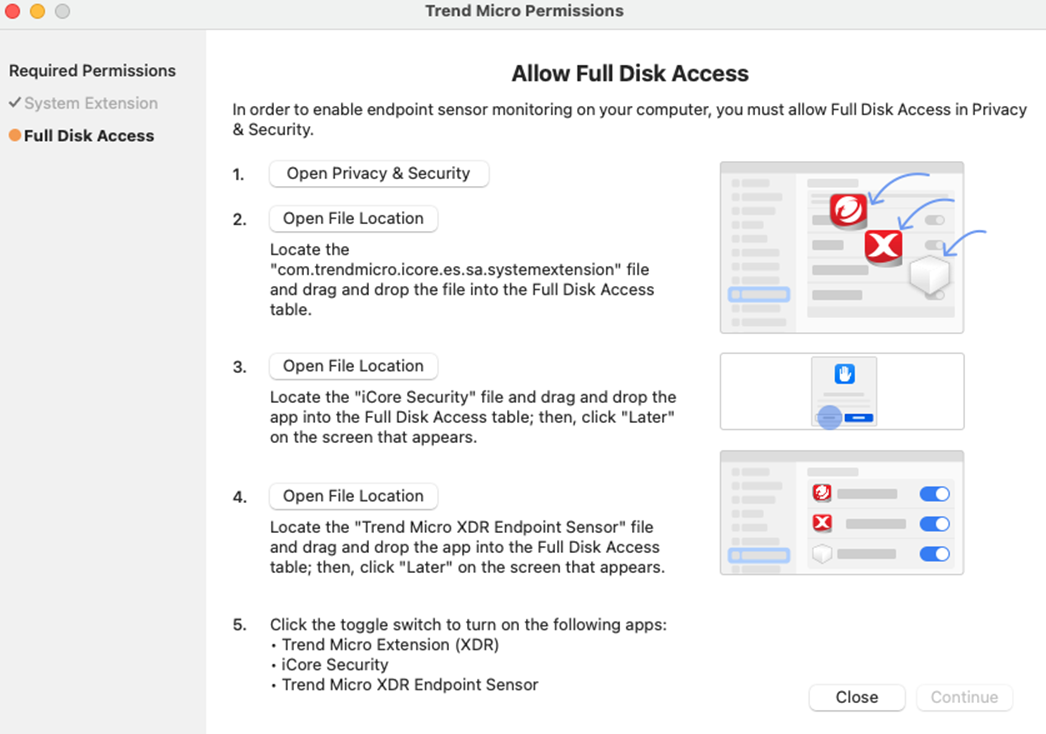
彈出 完全取用磁碟 的視窗,繼續按照順序點 Open File Location
在每一個彈出的資料夾都使用滑鼠拖曳檔案到 完全取用磁碟 的視窗
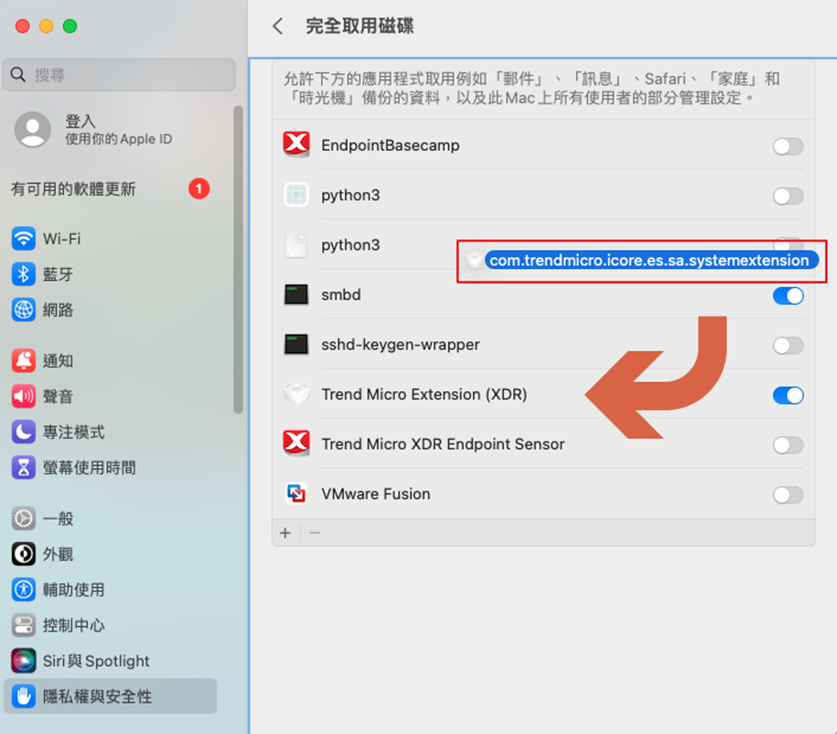
依照順序授予完全取用磁碟的權限:
EndpointBasecamp
Trend Micro Extension (XDR)
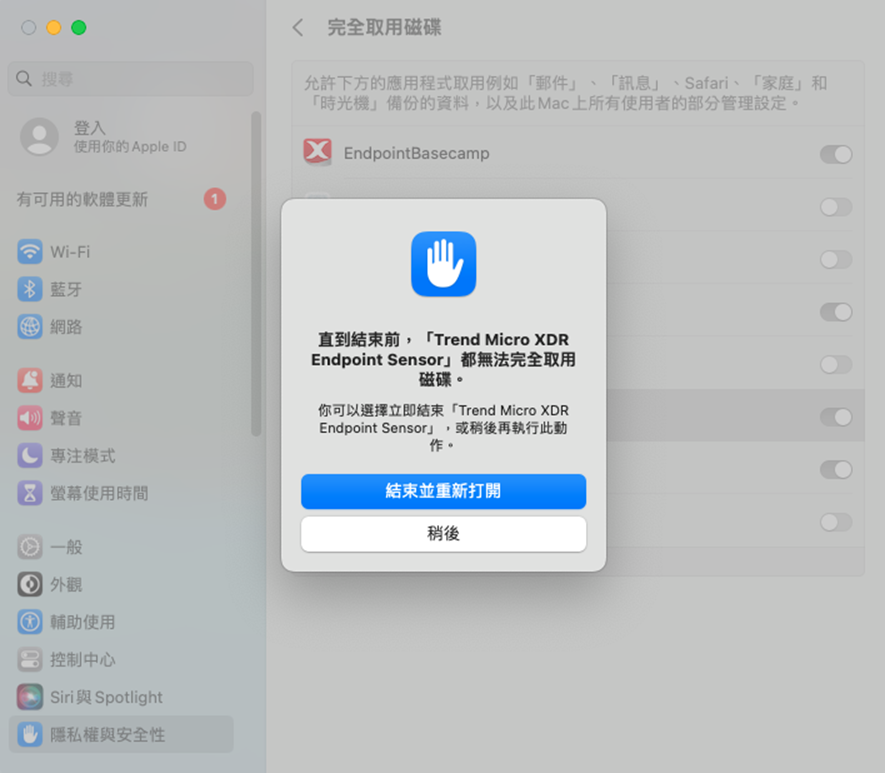
Trend Micro XDR Endpoint Sensor
程式會在最後會要求重新打開
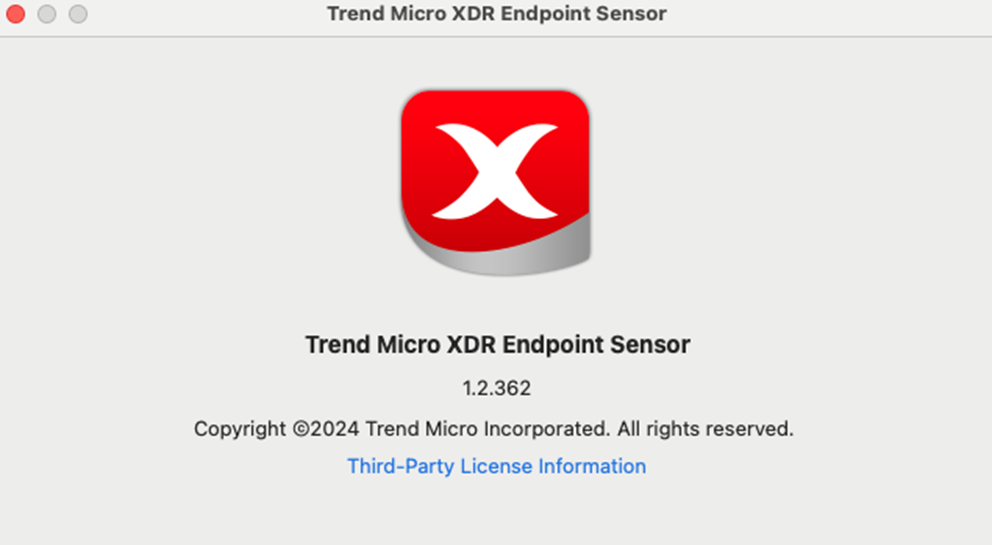
重新開啟後應不再會看到需要權限的視窗而是看到下列視窗(確認完就可以關閉)
Linux
直接安裝
請至 Endpoint Inventory 點擊 Agent Installer,在彈出的右側欄
找到 Endpoint Sensor 區塊。
依序完成以下設定後下載 Agent Installer:
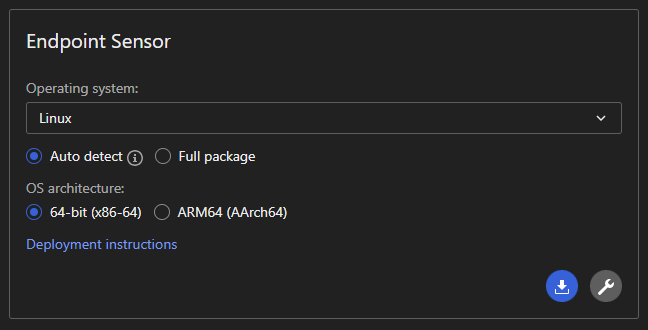
- Operating system:選擇 Linux。
- Installation Package Type:
- Auto detect:輕量安裝檔。執行時會自動偵測 Linux 發行版與核心版本並下載對應元件,適合頻寬充足的環境。
- Full package:完整安裝檔。檔案較大,內含特定發行版的所有必要元件,適合頻寬受限的環境使用。
- OS architecture:依據主機硬體規格選擇 64-bit (x86-64) 或 ARM64
(AArch64)。
- Agent installer proxy:
- 此選項僅影響「安裝過程」中的連線,與 Agent 安裝完成後的日常運作設定 (Runtime Proxy Settings) 無關。
- 預設為 Use Agent Installer Proxy Settings 依序測試所有已知 Proxy 並找到可用的,順序參考:Agent Installer Proxy Settings
- 僅在需強制指定安裝期間的連線通道時才需更改。
- 點擊右下角的 下載圖示 取得安裝檔
Auto detect 在偵測到版本之後會需要額外下載元件,會需要更多的網路資源
Full package 會需要自行選擇版本並拿到對應的作業系統部署
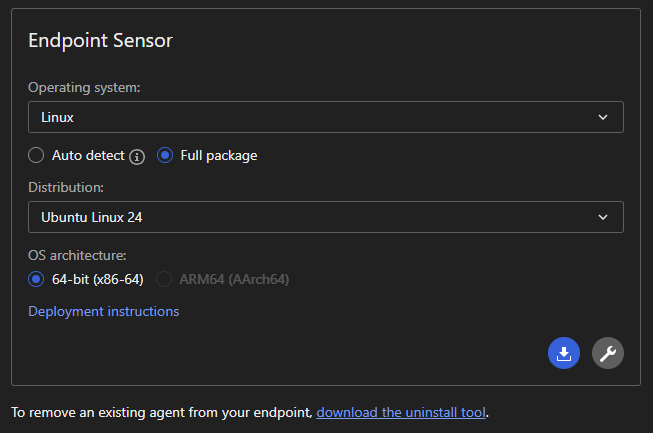
下載取得 Agent Installer 如果是 Auto detect 的可以看到 auto 的檔名
反之,則可以看到對應的作業系統版本在檔名上

Warning
注意:解壓縮取得的檔案請保持它們的名稱與相對位置
請勿重新命名、變更或移動安裝套件中的任何檔案或資料夾,避免安裝過程中找不到檔案。
Auto detect 會相較於 Full package 少了 packages 的資料夾


cd 移動到解壓縮目的資料夾,輸入 sudo ./tmxbc install

安裝完成後可以用 ps aux | grep tmxbc | grep -v grep 看到服務

Tip
如果服務有啟動但是沒有回報到 Endpoint Inventory 請按照下列順序初步檢查
- agent 與 Vision One 之間的時間差是否超過了三十分鐘
可以嘗試透過 date; curl "http://worldtimeapi.org/api/timezone/<customer_timezone>
檢查網際網路時間與裝置時間的差距
例如:date;curl http://worldtimeapi.org/api/timezone/Asia/Taipei

- 是否已經依照建議打開防火牆
- 是否能夠存取
https://files.trendmicro.com
- 如果沒有 proxy,使用
curl -k -l -vvv https://files.trendmicro.com
- 如果有 proxy,使用
curl -k -l -vvv -X proxy_url:port https://files.trendmicro.com

- Kernel 資訊
uname -r
grep "" /etc/*-release

5. 確認是否有 Linux Secure Boot(如果是 Endpoint Sensor 啟用有問題)
如果有 Linux Secure Boot 是否有 Enrolling Trend Micro public key
Note
如果初步檢查仍具問題需要收集下列資料
XBC debug log
- 修改設定啟用 debug
sudo vi /opt/TrendMicro/EndpointBasecamp/etc/.conf

- 重新啟動服務
systemctl restart tmxbc
- 重新啟動服務後確認
/opt/TrendMicro/EndpointBasecamp/logs/tmxbc.log 是否已經看到 Level
為 DEBUG

- 輸入下列指令將
/opt/TrendMicro/EndpointBasecamp/ 壓縮收集
zip tmxbc_debug.zip -r /opt/TrendMicro/EndpointBasecamp/

diagnostic package
如果是 Endpoint Sensor 啟用有問題請額外收集 diagnostic package
- 輸入下列指令產生 diagnostic package
sudo /opt/TrendMicro/vls_agent/vlsa_control -d
- 收集下列資料夾與檔案
/var/opt/TrendMicro/vls_agent/diag
/var/opt/TrendMicro/vls_agent/xbc.ini
/var/opt/TrendMicro/vls_agent/diag/meta.json
重要主機設定
在 Cyber Risk Exposure Management > Continuous Risk Management >
Attack Surface Discovery 點擊 Devices

向下滑動找到 Device List 重要主機會標示  圖示
圖示
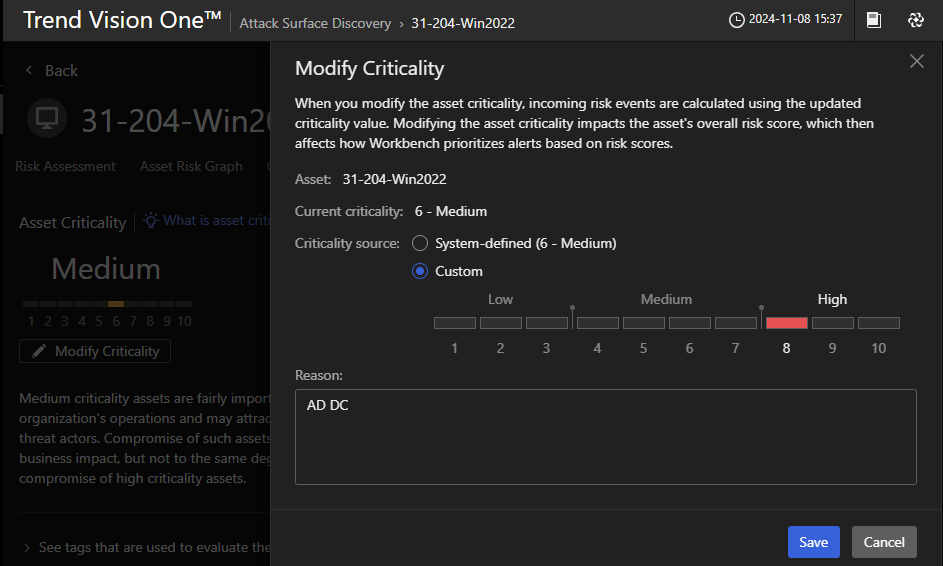
亦可手動調整 Asset Criticality 至 8 或更高來標示為重要主機
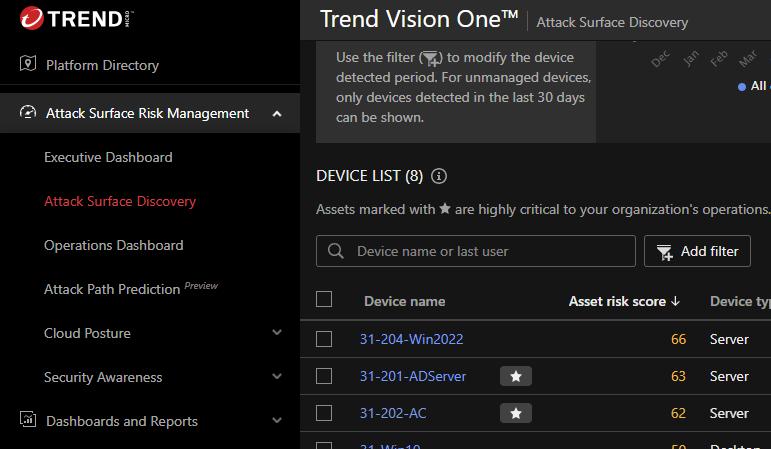
點擊裝置名稱後的頁面中選擇 Asset Profile 可以看到現在的 Asset Criticality 點擊 Modify
Criticality 可進行修改

在 Modify Criticality 依照該裝置的重要程度調整 Criticality source
Runtime Proxy 設定
端點回報到主控台後將取得 Runtime Proxy 可以限制端點僅存取特定的 Service Gateway 或是 Custom
proxy
在 Endpoint Security 的 Endpoint Inventory 中點擊齒輪圖示後點擊
Global settings

切換頁面至 Runtime Proxy Settings 可以看見基本的 Policy 為嘗試所有 Service Gateway
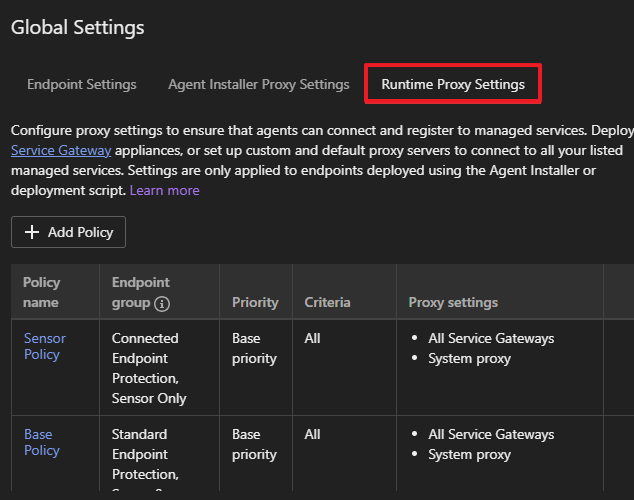
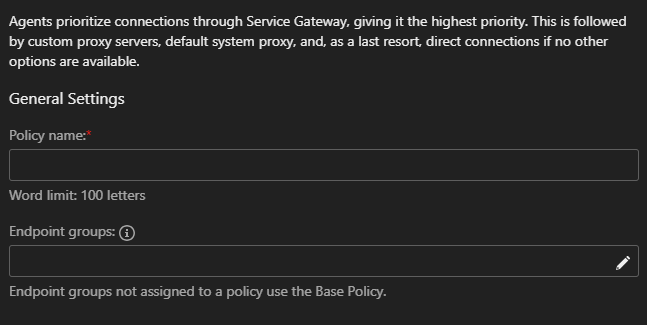
點擊 Add Policy 新增 Policy 首先命名並選擇 Endpoint groups
Note
於上方的說明看到,如果在同一個 Policy 有不同的可選項優先排序為:
- Service Gateway
- Custom proxy servers
- Default system proxy
- Direct connections
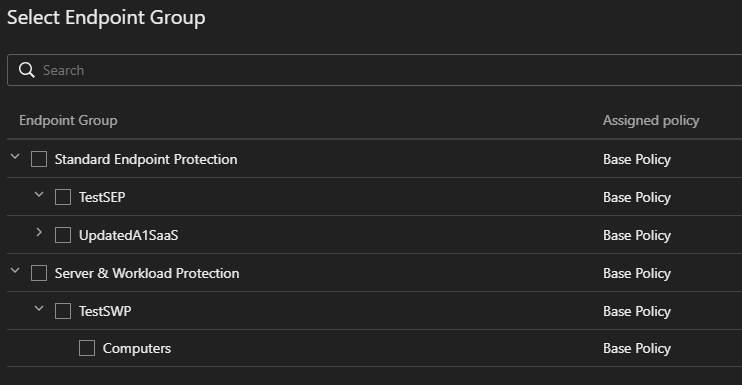
在選擇 Endpoint groups 的畫面中可以看到該 groups 現在使用的 Policy
Warning
一個 Endpoint groups 只能被指派一個 Policy 而沒有 Policy 的將回到預設的 Policy
如果將 Endpoint groups 指派給新的 Policy 而又取消指派可能會導致其回到預設的 Policy
將畫面移動至下方可以看到 Base priority
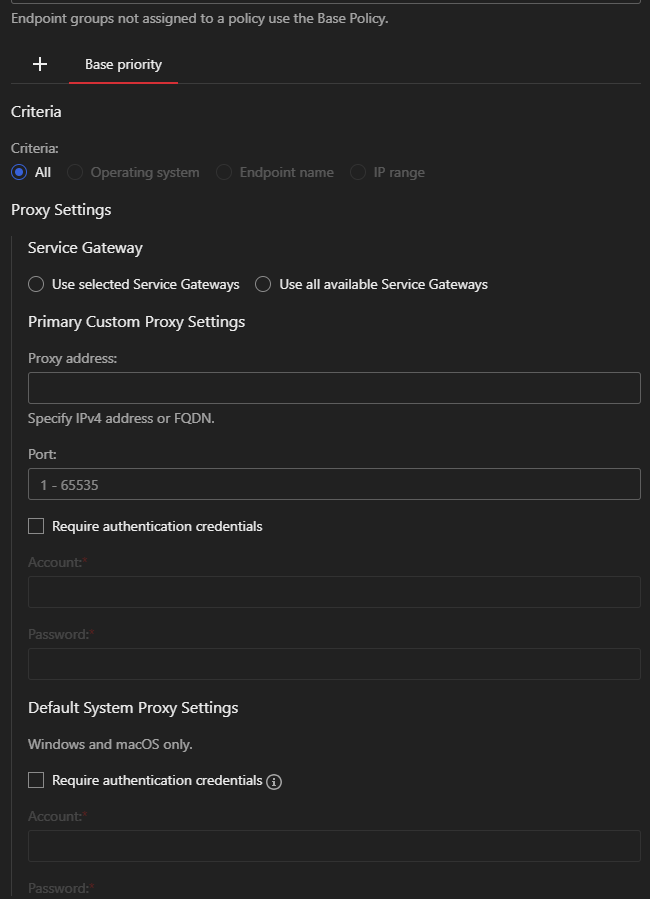
由於同一個 Policy 的端點將會從高優先級套用到低優先級
如果沒有任何符合的範圍,或是符合範圍的沒有可連線的 Proxy Settings
最後會套用到 Base priority 依照需要的設定邏輯不同可以簡單分成
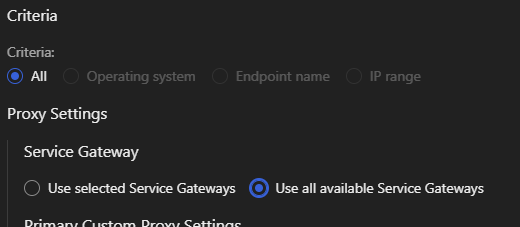
- 嘗試完所有 priority 後,嘗試所有可用的 Service Gateway 連線 (選擇 Use all available Service
Gateways)
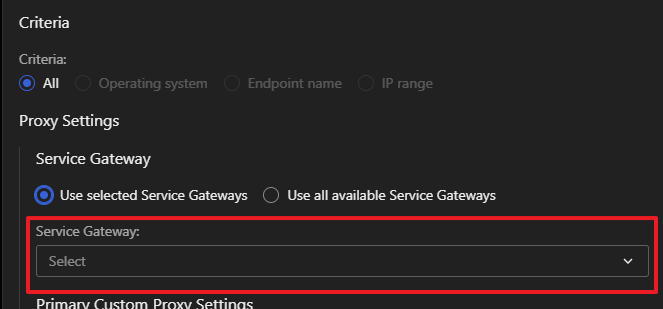
- 嘗試完所有 priority 後,僅使用 system proxy 或是直接連線 (選擇 Use selected Service Gateways 後
Select 部分不設定)
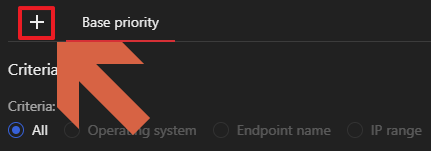
設定完成 Base priority 則點擊旁邊的加號新增 priority
可以根據作業系統、端點名稱、端點 IP 位置作為條件
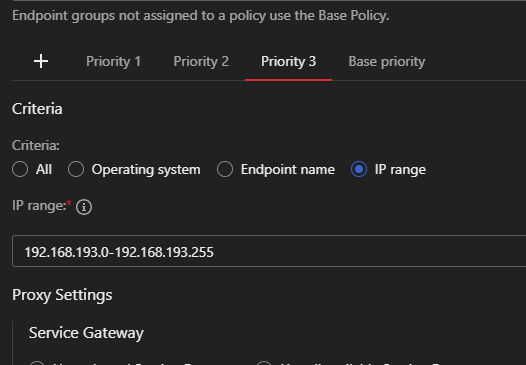
可以拖曳 priority 調整不同條件的優先順序
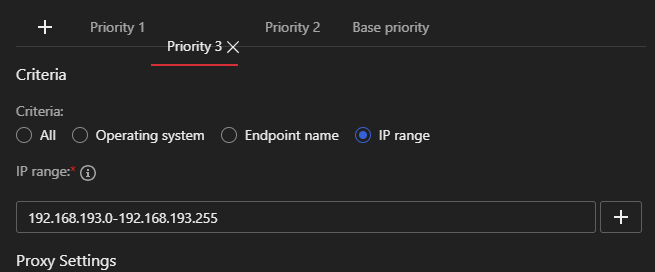
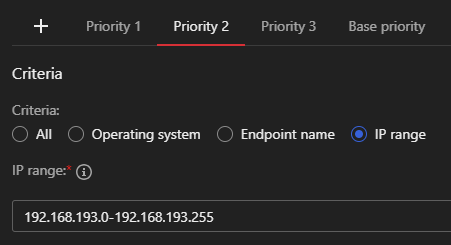
如圖所示,將 Priority 3 拖曳至 Priority 2 前面,原來的 Priority 3 將修改為 Priority 2 並連帶修改所有優先級低於自己的 priority
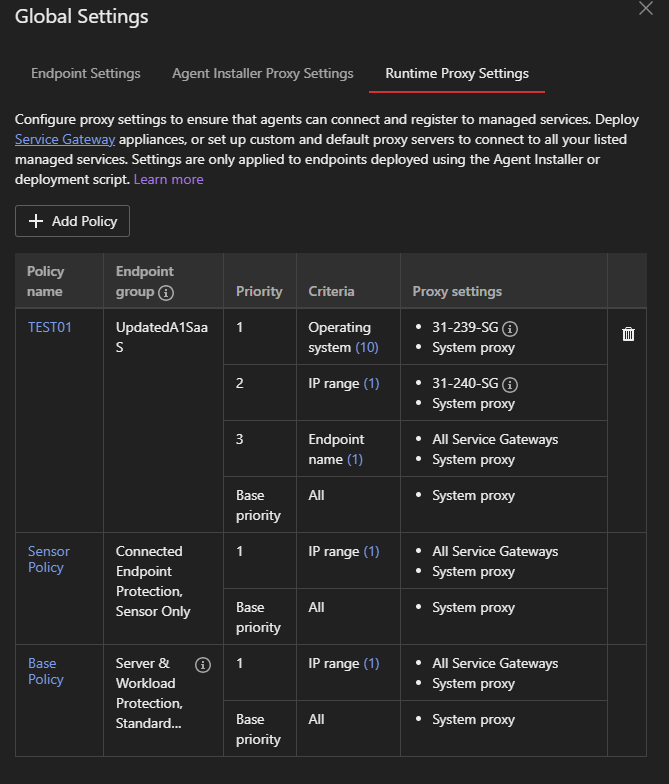
設定完成後,可以在 Runtime Proxy Settings 的畫面檢視修改後的設定
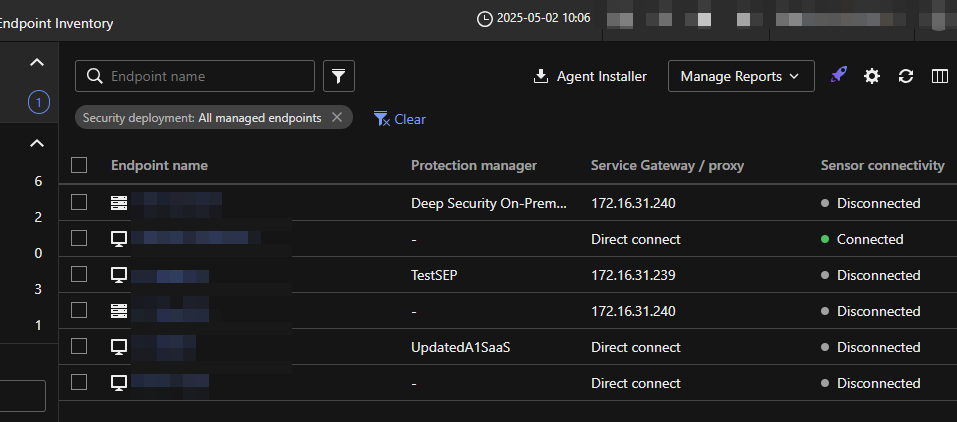
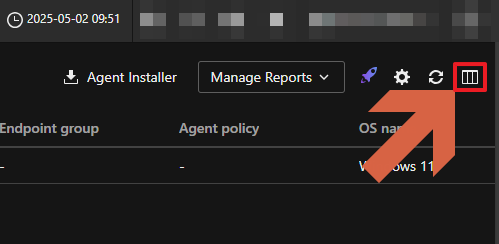
如果需要更方便檢視端點現在使用的連線方式,可以新增 Service Gateway / proxy 欄位
點擊右上方的 Customize Columns 按鈕
勾選 Service Gateway / proxy 並拖曳至需要的順序
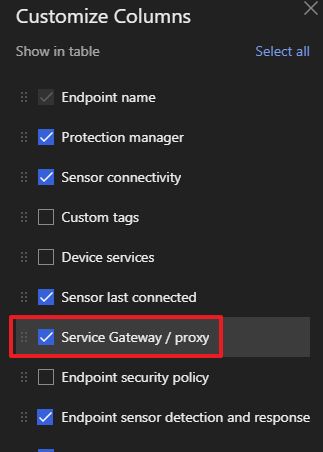
回到 Endpoint Inventory 即可看到新增的 Service Gateway / proxy 欄位

在 Endpoint Inventory 亦可拖曳設定顯示的順序
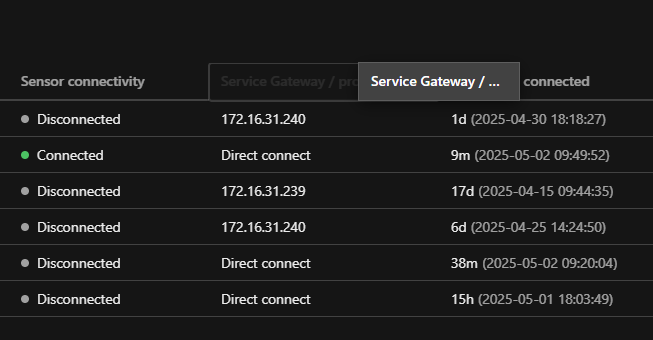
等待一段時間後檢查端點是否依照 Runtime Proxy Settings 連線
